Setup and No-Code Applications
In this Lab, we will explore computer vision (CV) applications using the Seeed Studio Grove Vision AI Module V2, a powerful yet compact device specifically designed for embedded machine learning applications. Based on the Himax WiseEye2 chip, this module is designed to enable AI capabilities on edge devices, making it an ideal tool for Edge Machine Learning (ML) applications.
Introduction
Grove Vision AI Module (V2) Overview
The Grove Vision AI (V2) is an MCU-based vision AI module that utilizes a Himax WiseEye2 HX6538 processor featuring a dual-core Arm Cortex-M55 and an integrated ARM Ethos-U55 neural network unit. The Arm Ethos-U55 is a machine learning (ML) processor class, specifically designed as a microNPU, to accelerate ML inference in area-constrained embedded and IoT devices. The Ethos-U55, combined with the AI-capable Cortex-M55 processor, provides a 480x uplift in ML performance over existing Cortex-M-based systems. Its clock frequency is 400 MHz, and its internal system memory (SRAM) is configurable, with a maximum capacity of 2.4 MB.

Note: Based on Seeed Studio documentation, besides the Himax internal memory of 2.5MB (2.4MB SRAM + 64KB ROM), the Grove Vision AI (V2) is also equipped with a 16MB/133 MHz external flash.

Below is a block Diagram of the Grove Vision AI (V2) system, including a camera and a master controller.

With interfaces like IIC, UART, SPI, and Type-C, the Grove Vision AI (V2) can be easily connected to devices such as XIAO, Raspberry Pi, BeagleBoard, and ESP-based products for further development. For instance, integrating Grove Vision AI V2 with one of the devices from the XIAO family makes it easy to access the data resulting from inference on the device through the Arduino IDE or MicroPython, and conveniently connect to the cloud or dedicated servers, such as Home Assistance.
Using the I2C Grove connector, the Grove Vision AI V2 can be easily connected with any Master Device.
Besides performance, another area to comment on is Power Consumption. For example, in a comparative test against the XIAO ESP32S3 Sense, running Swift-YOLO Tiny 96x96, despite achieving higher performance (30 FPS vs. 5.5 FPS), the Grove Vision AI V2 exhibited lower power consumption (0.35 W vs. 0.45 W) when compared with the XIAO ESP32S3 Sense.
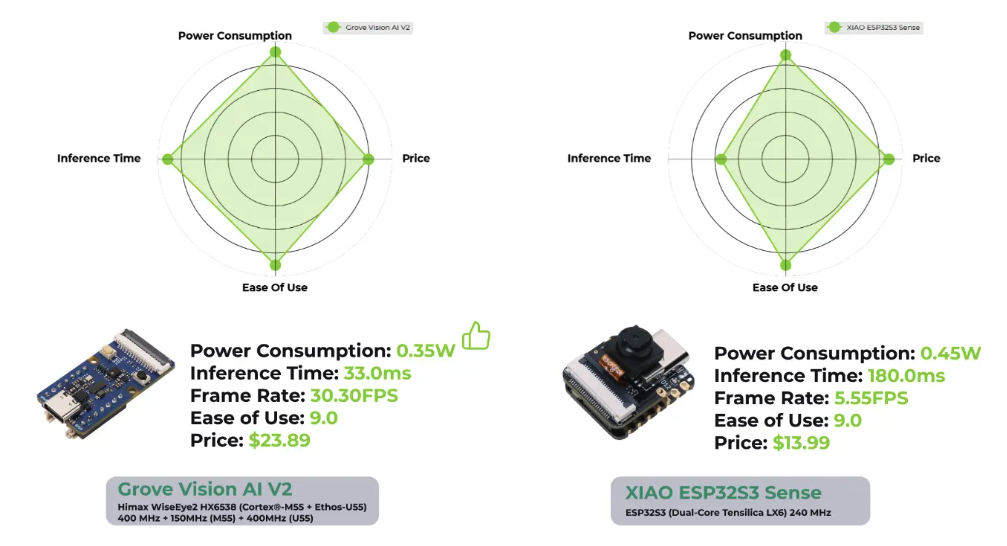
The above comparison (and with other devices) can be found in the article 2024 MCU AI Vision Boards: Performance Comparison, which confirms the power of Grove Vision AI (V2).
Camera Installation
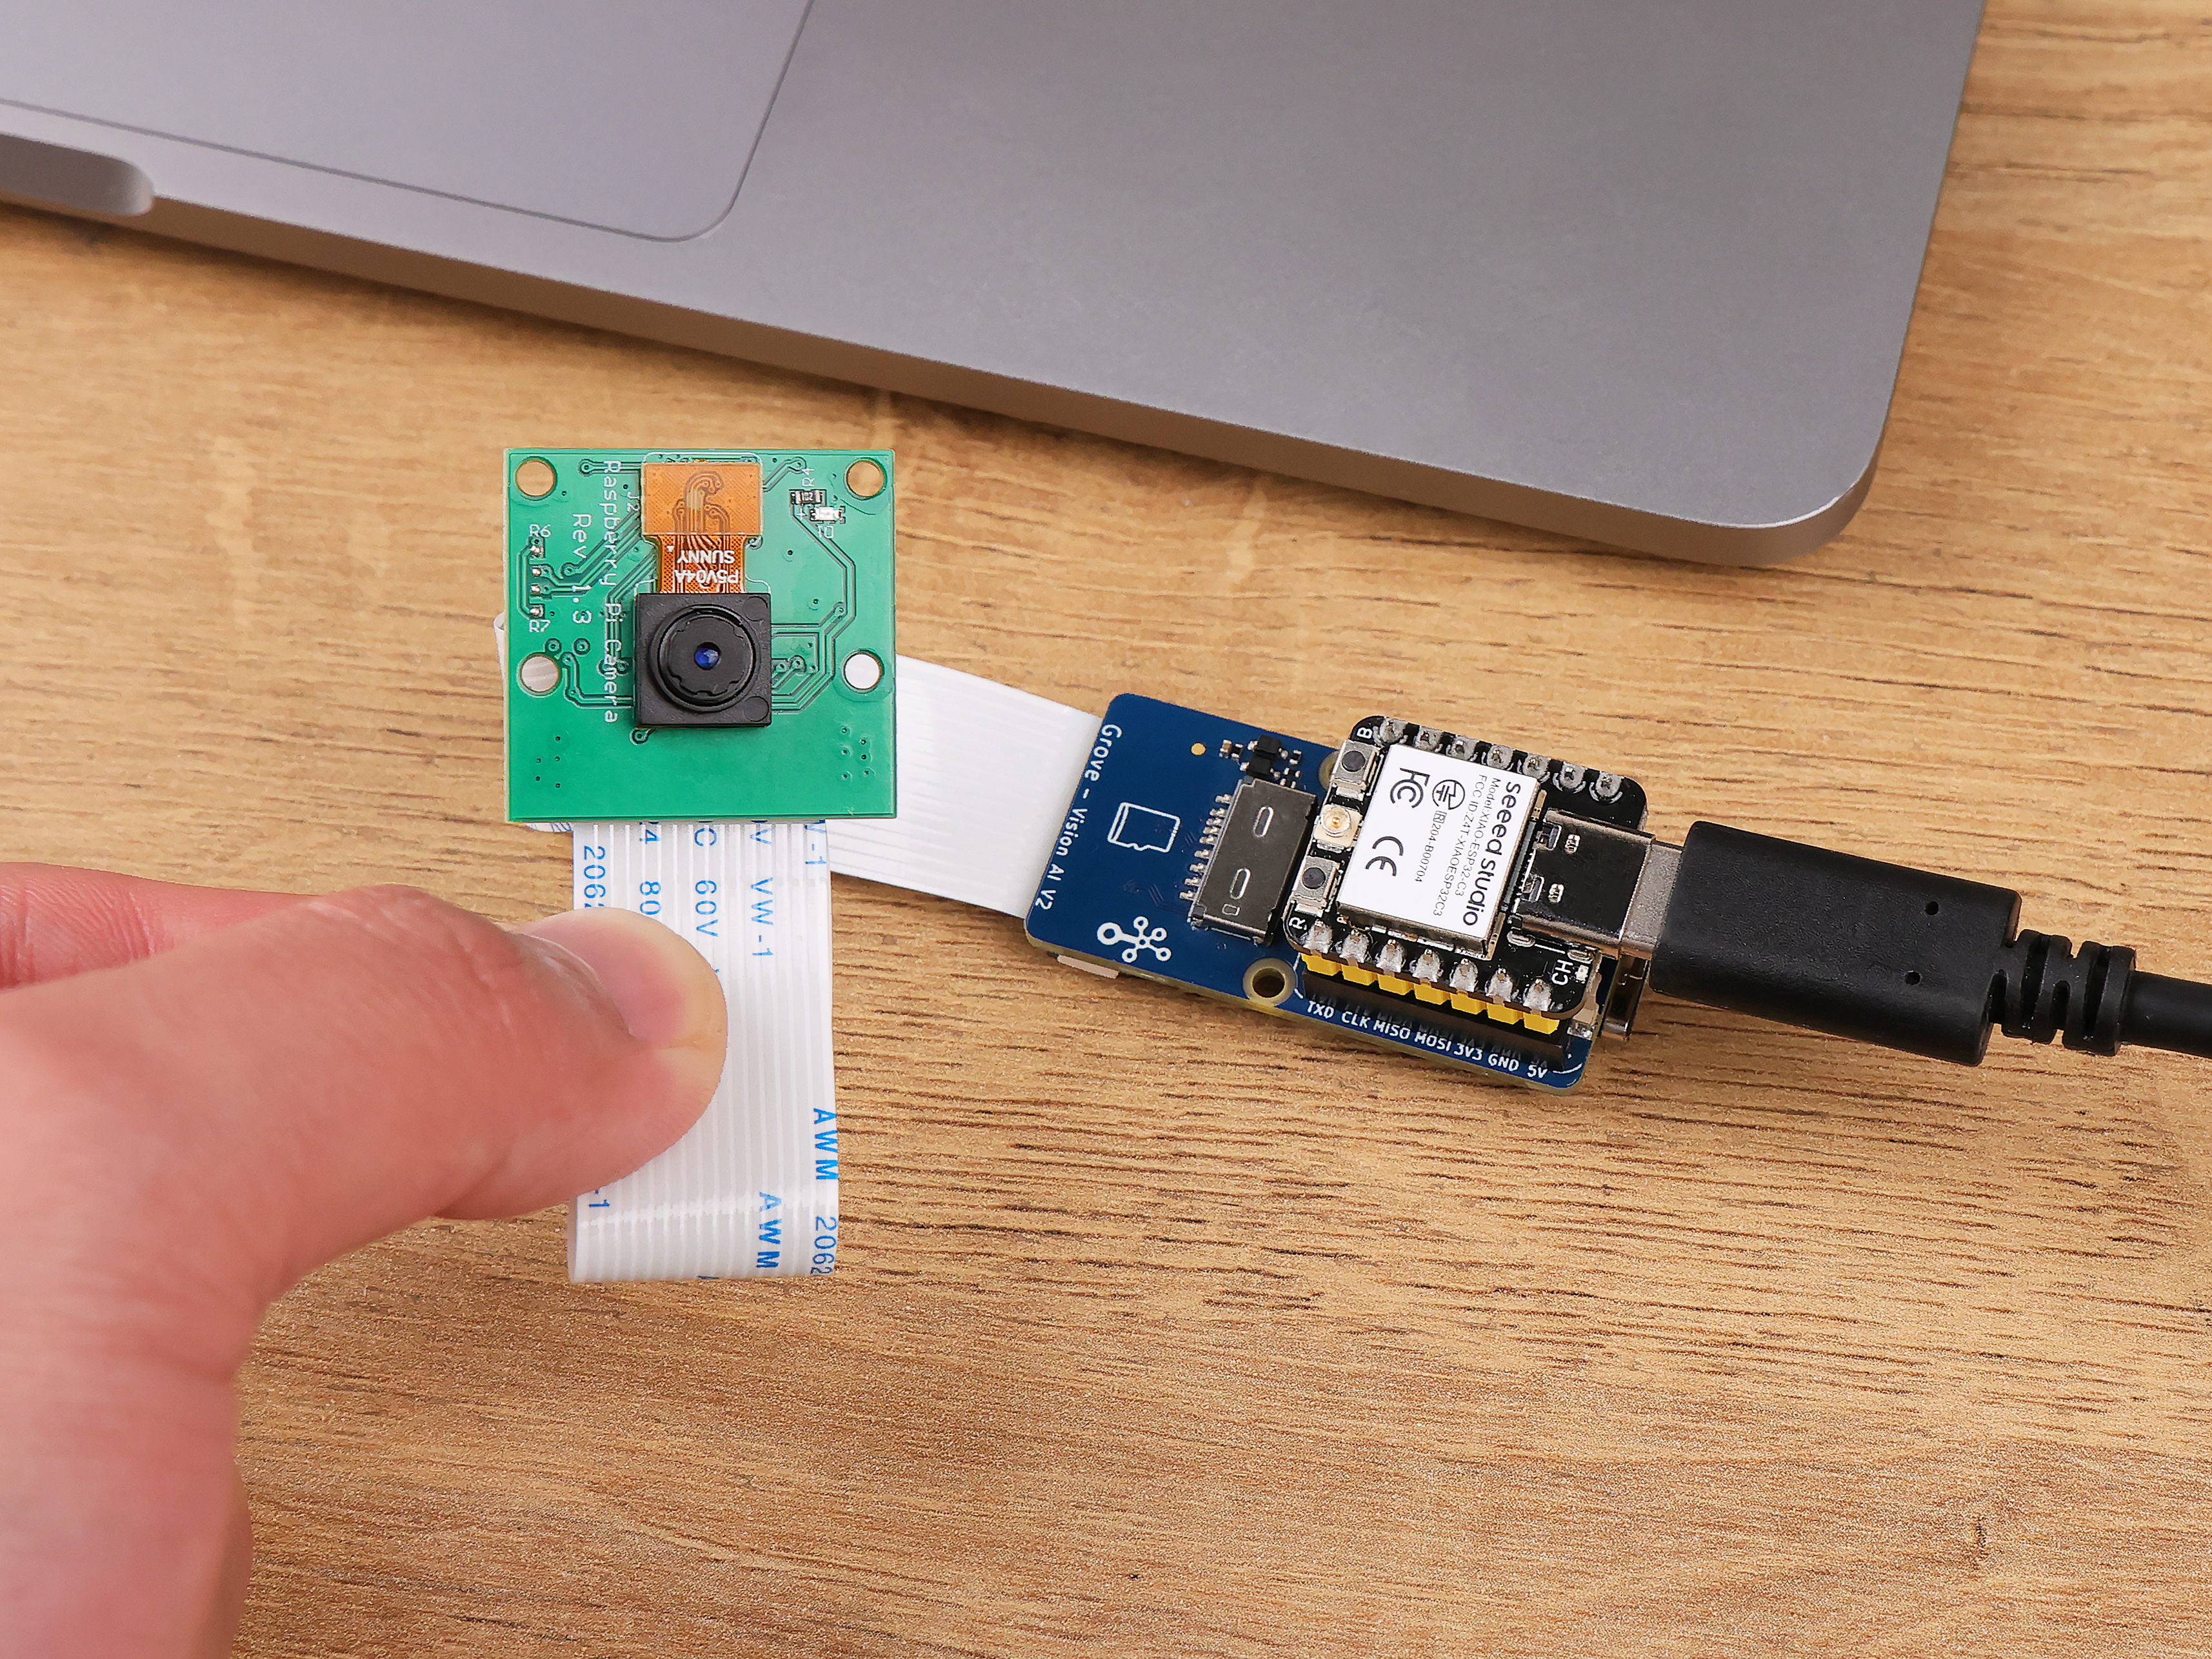
Having the Grove Vision AI (V2) and camera ready, you can connect, for example, a Raspberry Pi OV5647 Camera Module via the CSI cable.
When connecting, please pay attention to the direction of the row of pins and ensure they are plugged in correctly, not in the opposite direction.

The SenseCraft AI Studio
The SenseCraft AI Studio is a robust platform that offers a wide range of AI models compatible with various devices, including the XIAO ESP32S3 Sense and the Grove Vision AI V2. In this lab, we will walk through the process of using an AI model with the Grove Vision AI V2 and preview the model’s output. We will also explore some key concepts, settings, and how to optimize the model’s performance.

Models can also be deployed using the SenseCraft Web Toolkit, a simplified version of the SenseCraft AI Studio.
We can start using the SenseCraft Web Toolkit for simplicity, or go directly to the SenseCraft AI Studio, which has more resources.
The SenseCraft Web-Toolkit
The SenseCraft Web Toolkit is a visual model deployment tool included in the SSCMA(Seeed SenseCraft Model Assistant). This tool enables us to deploy models to various platforms with ease through simple operations. The tool offers a user-friendly interface and does not require any coding.
The SenseCraft Web Toolkit is based on the Himax AI Web Toolkit, which can (optionally) be downloaded from here. Once downloaded and unzipped to the local PC, double-click index.html to run it locally.
But in our case, let’s follow the steps below to start the SenseCraft-Web-Toolkit:
- Open the SenseCraft-Web-Toolkit website on a web browser as Chrome.
- Connect Grove Vision AI (V2) to your computer using a Type-C cable.
- Having the XIAO connected, select it as below:

- Select the device/Port and press
[Connect]:

Note: The WebUSB tool may not function correctly in certain browsers, such as Safari. Use Chrome instead.
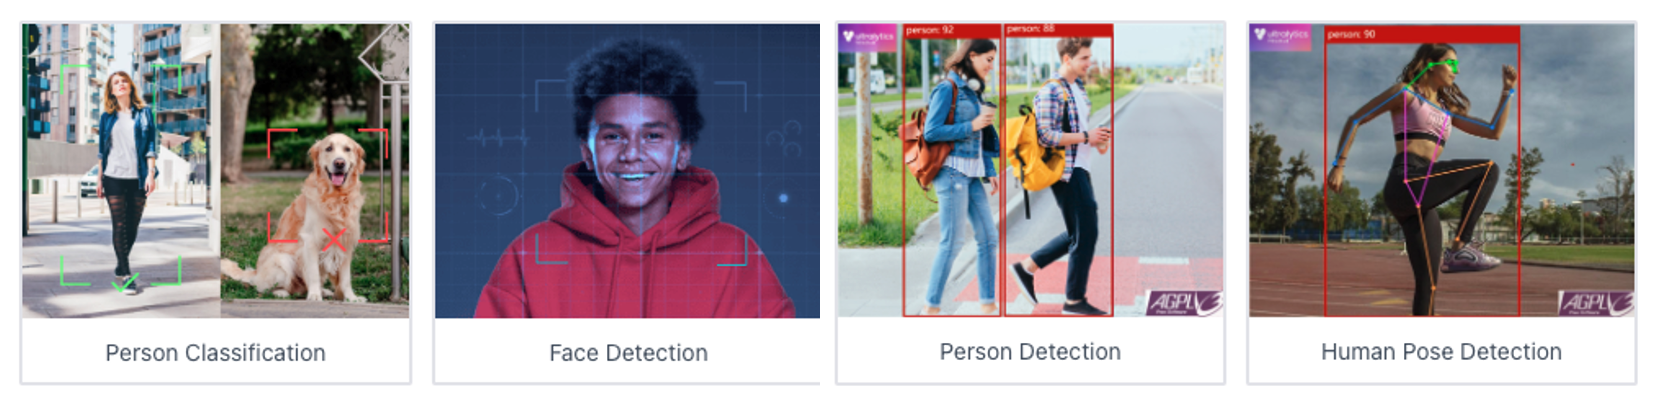
We can try several Basic Computer Vision models previously uploaded by Seeed Studio. Passing the cursor over the AI models, we can have some information about them, such as name, description, category (Image Classification, Object Detection, or Pose/Keypoint Detection), the algorithm (like YOLO V5 or V8, FOMO, MobileNet V2, etc.) and metrics (Accuracy or mAP).
We can choose one of those ready-to-use AI models by clicking on it and pressing the [Send] button, or upload our model.
For the SenseCraft AI platform, follow the instructions here.
Exploring CV AI models
Object Detection
Object detection is a pivotal technology in computer vision that focuses on identifying and locating objects within digital images or video frames. Unlike image classification, which categorizes an entire image into a single label, object detection recognizes multiple objects within the image and determines their precise locations, typically represented by bounding boxes. This capability is crucial for a wide range of applications, including autonomous vehicles, security, surveillance systems, and augmented reality, where understanding the context and content of the visual environment is essential.
Common architectures that have set the benchmark in object detection include the YOLO (You Only Look Once), SSD (Single Shot MultiBox Detector), FOMO (Faster Objects, More Objects), and Faster R-CNN (Region-based Convolutional Neural Networks) models.
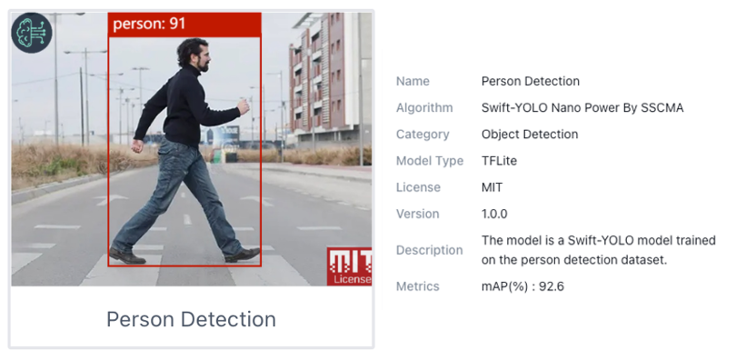
Let’s choose one of the ready-to-use AI models, such as Person Detection, which was trained using the Swift-YOLO algorithm.
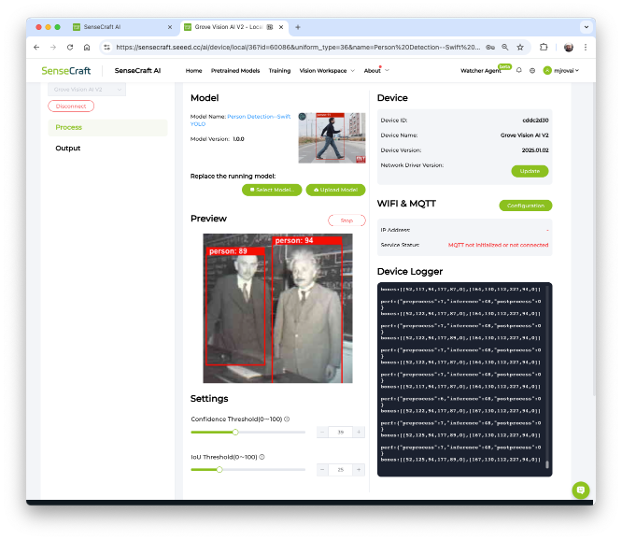
Once the model is uploaded successfully, you can see the live feed from the Grove Vision AI (V2) camera in the Preview area on the right. Also, the inference details can be shown on the Serial Monitor by clicking on the [Device Log] button at the top.
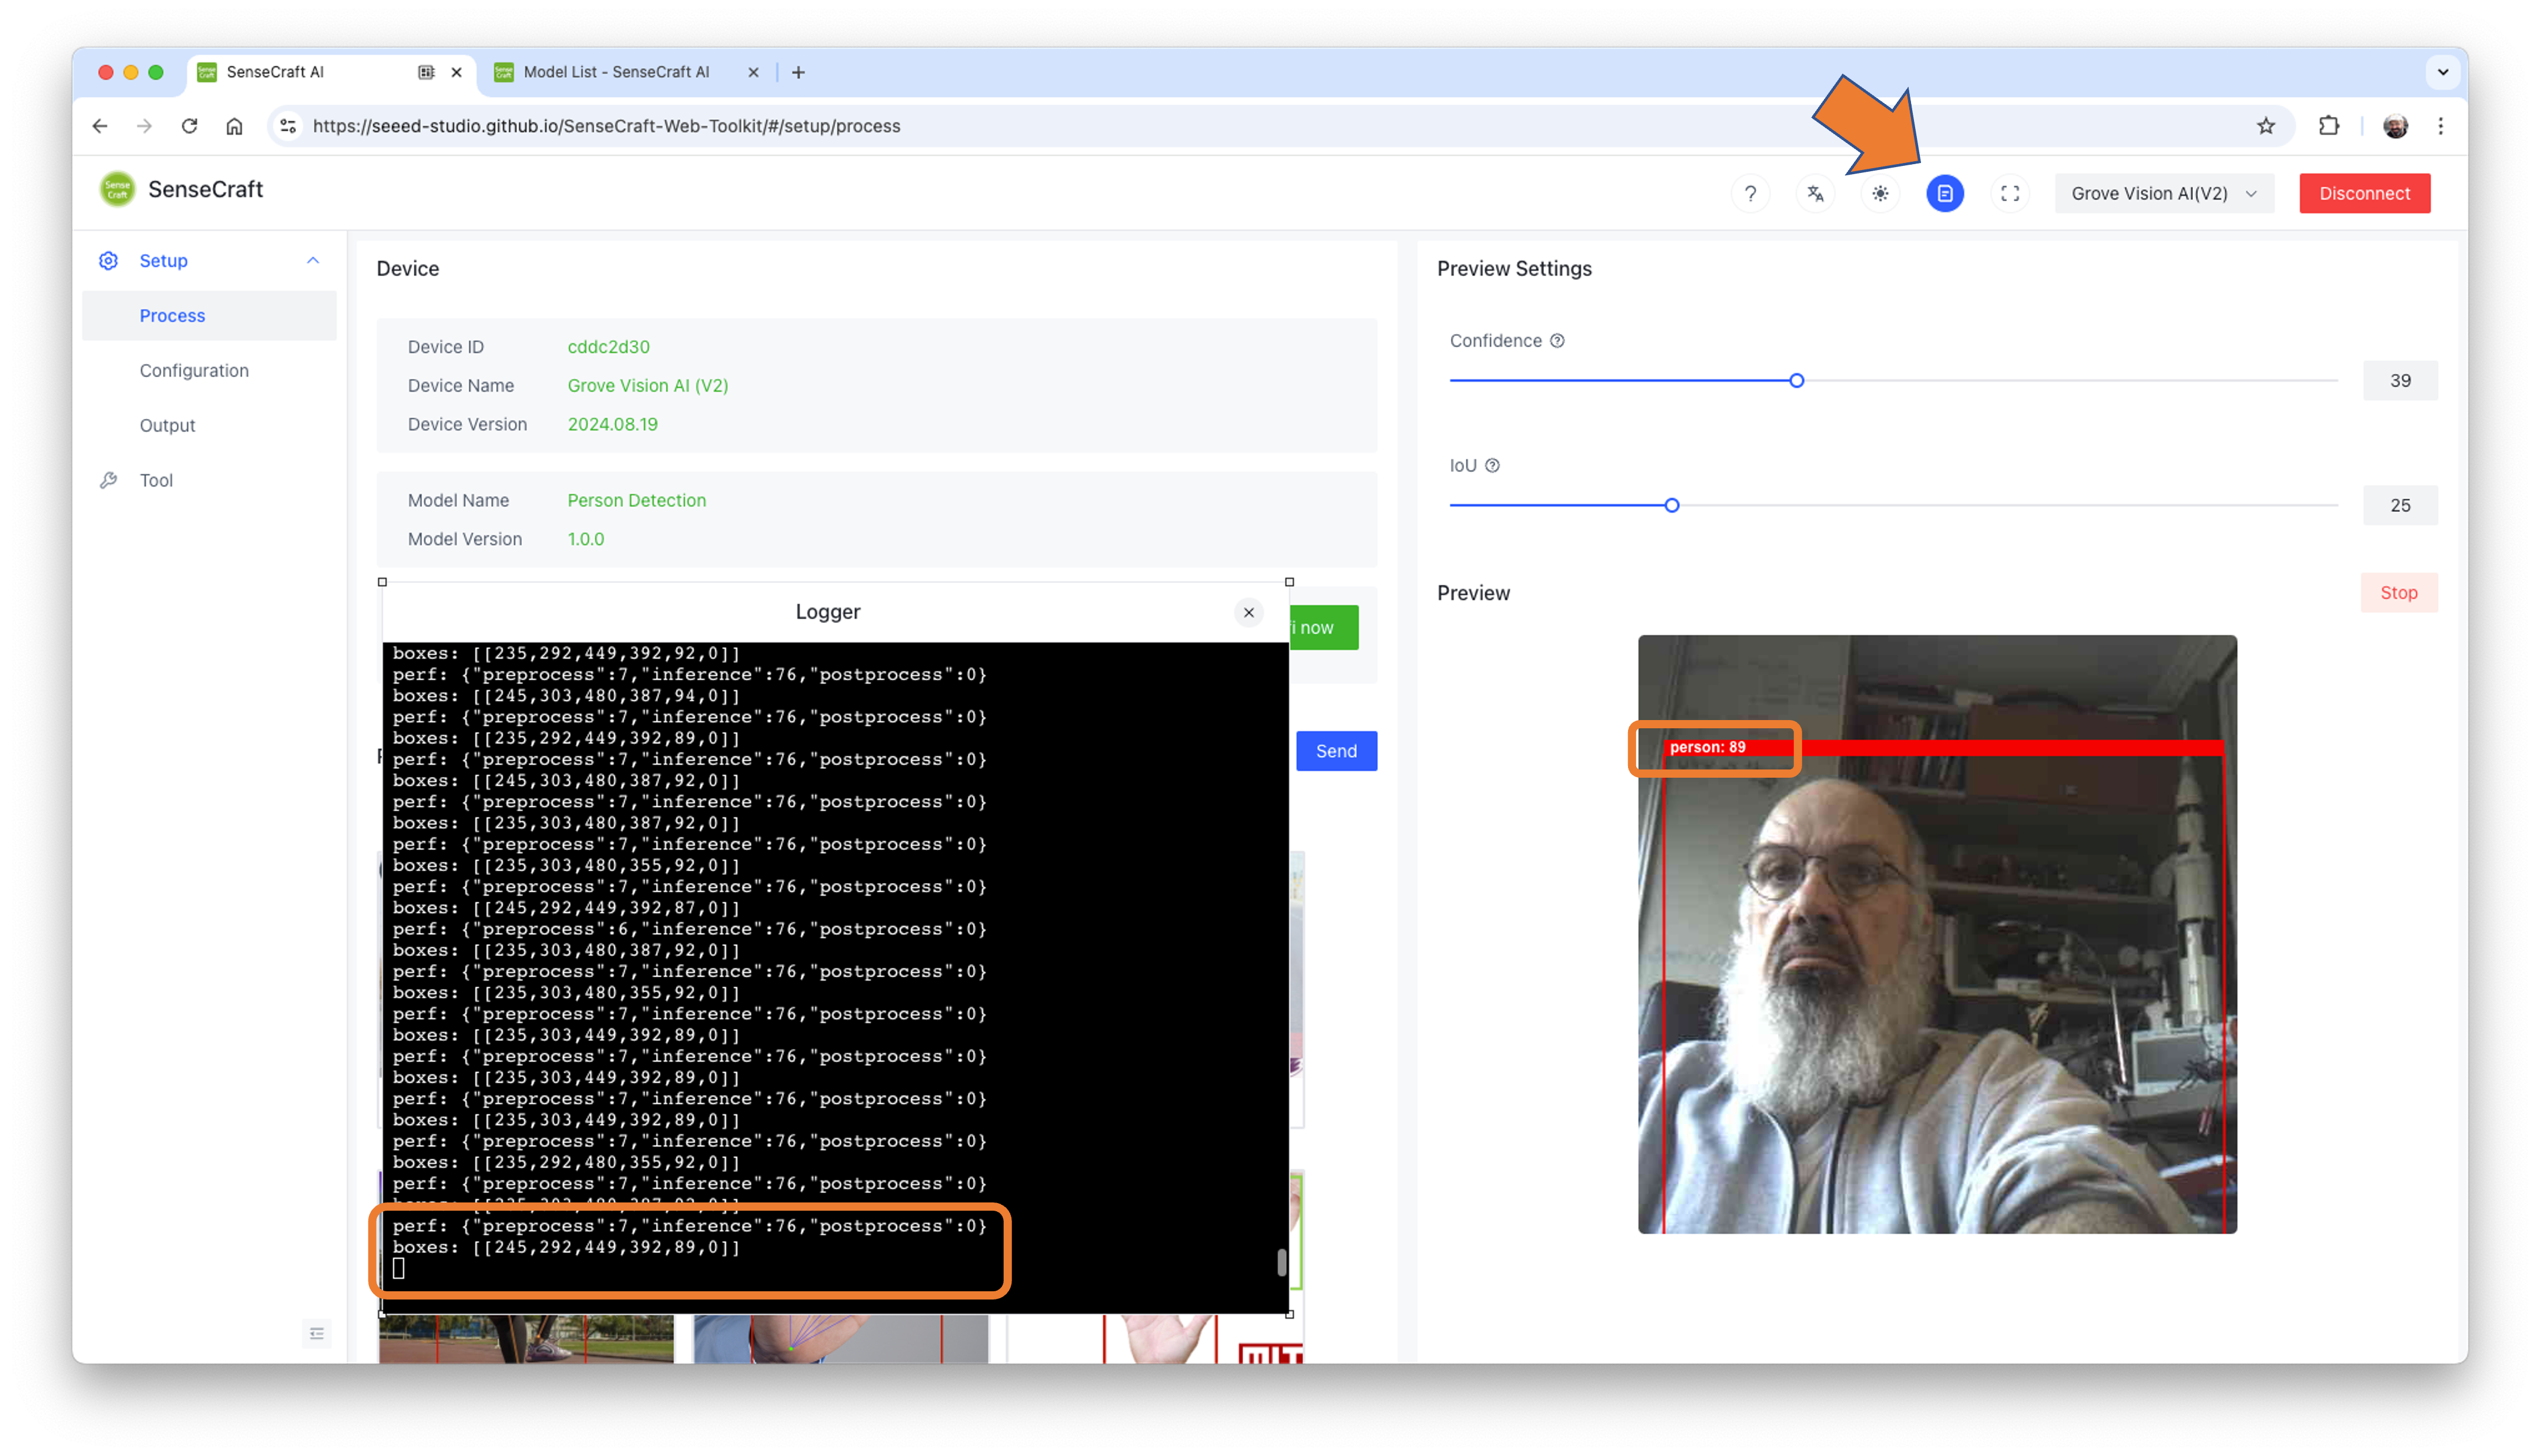
In the SenseCraft AI Studio, the Device Logger is always on the screen.
Pointing the camera at me, only one person was detected, so that the model output will be a single “box”. Looking in detail, the module sends continuously two lines of information:

perf (Performance), displays latency in milliseconds.
- Preprocess time (image capture and Crop): 7ms;
- Inference time (model latency): 76ms (13 fps)
- Postprocess time (display of the image and inclusion of data): less than 0ms.
boxes: Show the objects detected in the image. In this case, only one.
- The box has the x, y, w, and h coordinates of (245, 292,449,392), and the object (person, label 0) was captured with a value of .89.
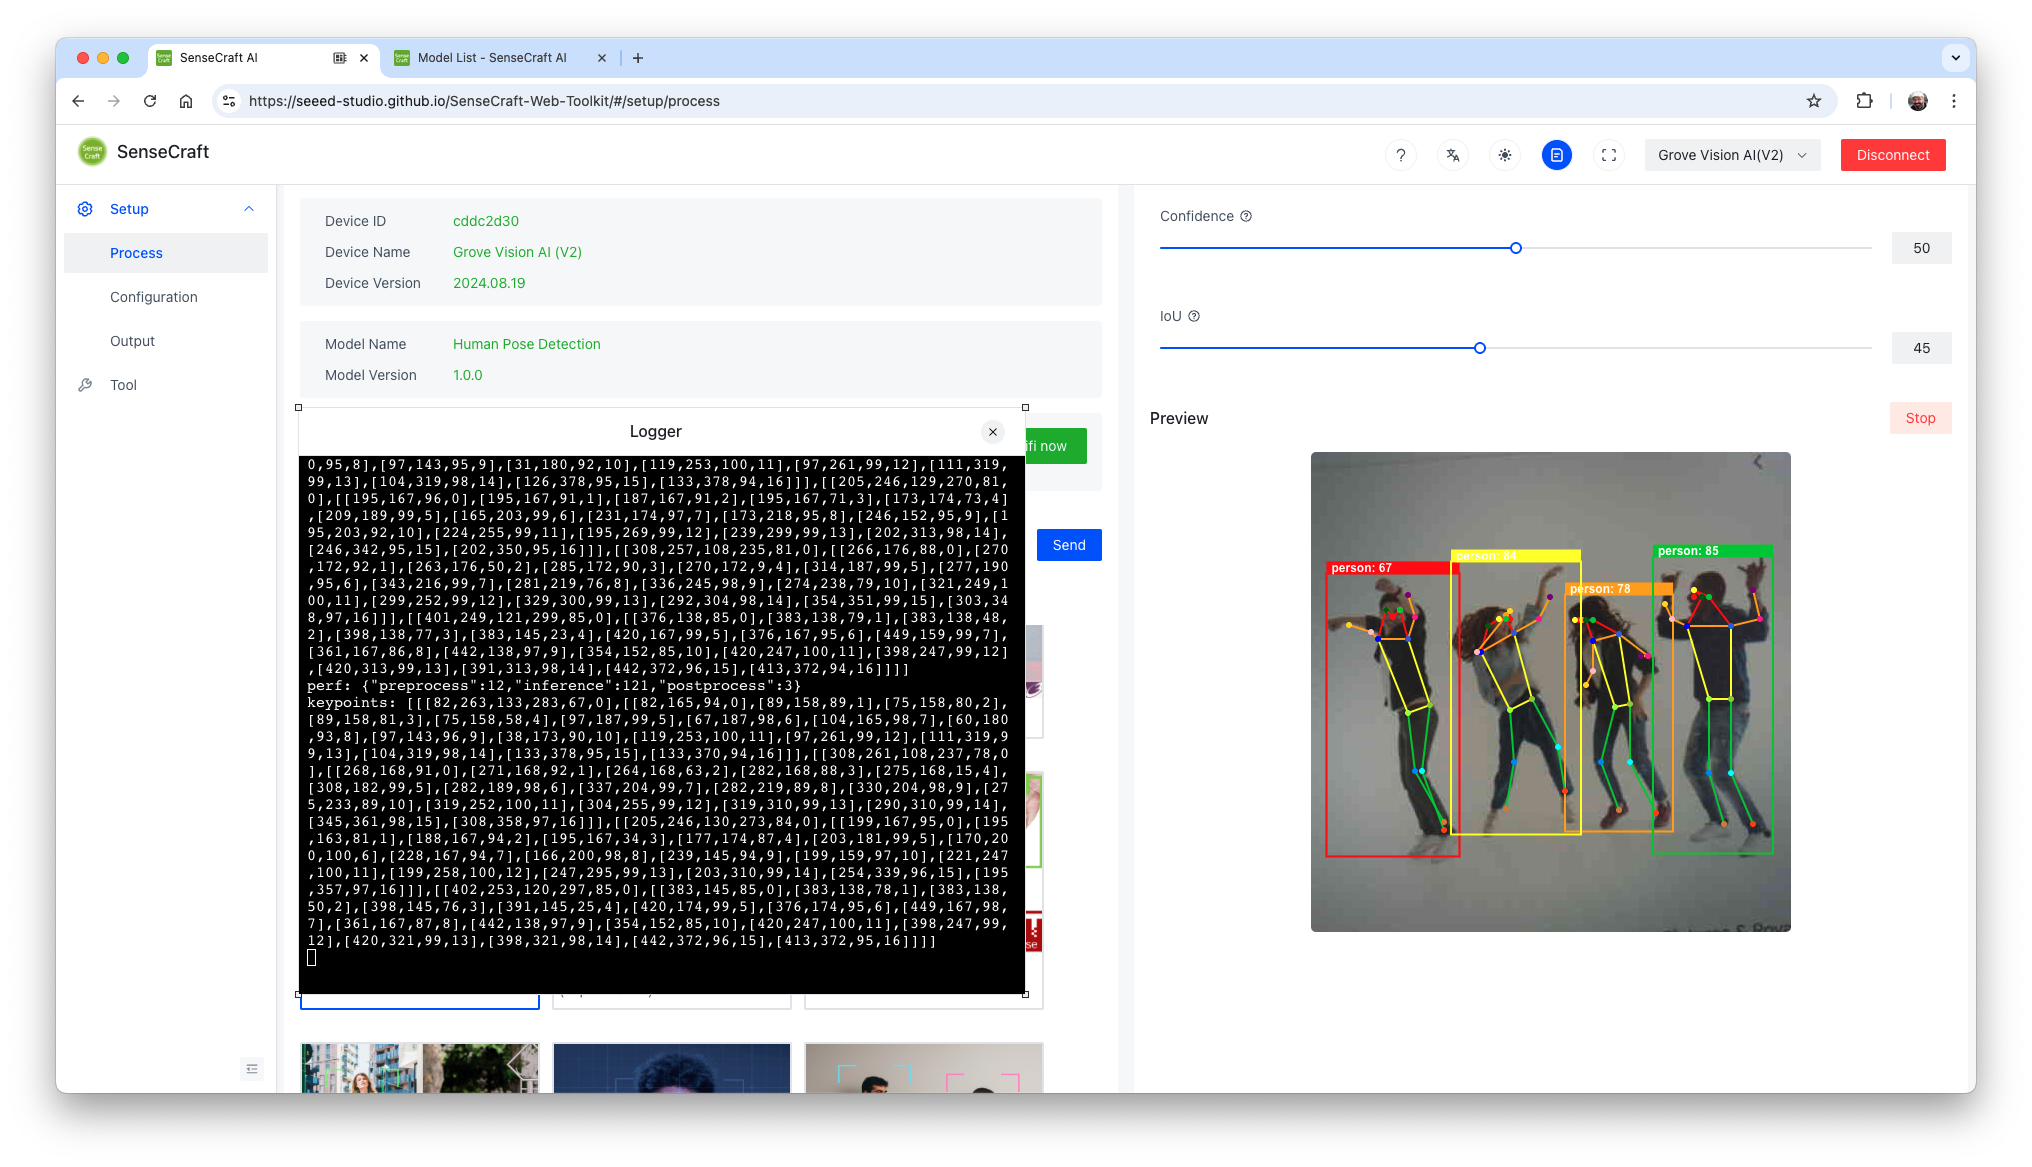
If we point the camera at an image with several people, we will get one box for each person (object):
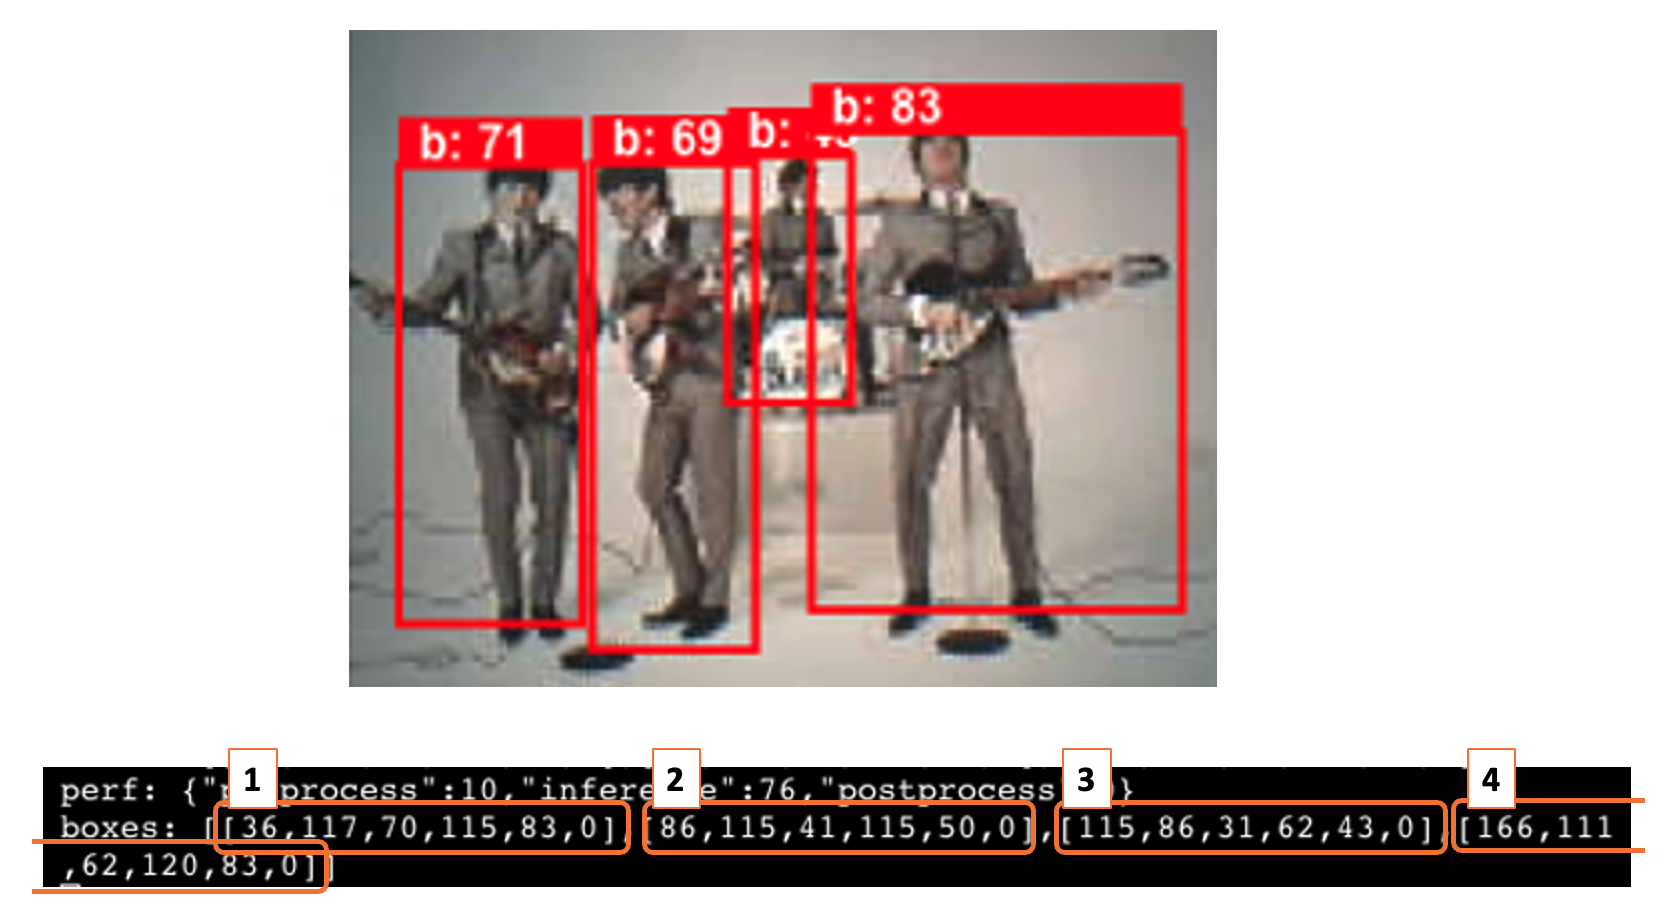
On the SenseCraft AI Studio, the inference latency (48ms) is lower than on the SenseCraft ToolKit (76ms), due to a distinct deployment implementation.
Power Consumption
The peak power consumption running this Swift-YOLO model was 410 milliwatts.
Preview Settings
We can see that in the Settings, two settings options can be adjusted to optimize the model’s recognition accuracy.
Confidence: Refers to the level of certainty or probability assigned to its predictions by a model. This value determines the minimum confidence level required for the model to consider a detection as valid. A higher confidence threshold will result in fewer detections but with higher certainty, while a lower threshold will allow more detections but may include some false positives.
IoU: Used to assess the accuracy of predicted bounding boxes compared to truth bounding boxes. IoU is a metric that measures the overlap between the predicted bounding box and the ground truth bounding box. It is used to determine the accuracy of the object detection. The IoU threshold sets the minimum IoU value required for a detection to be considered a true positive. Adjusting this threshold can help in fine-tuning the model’s precision and recall.
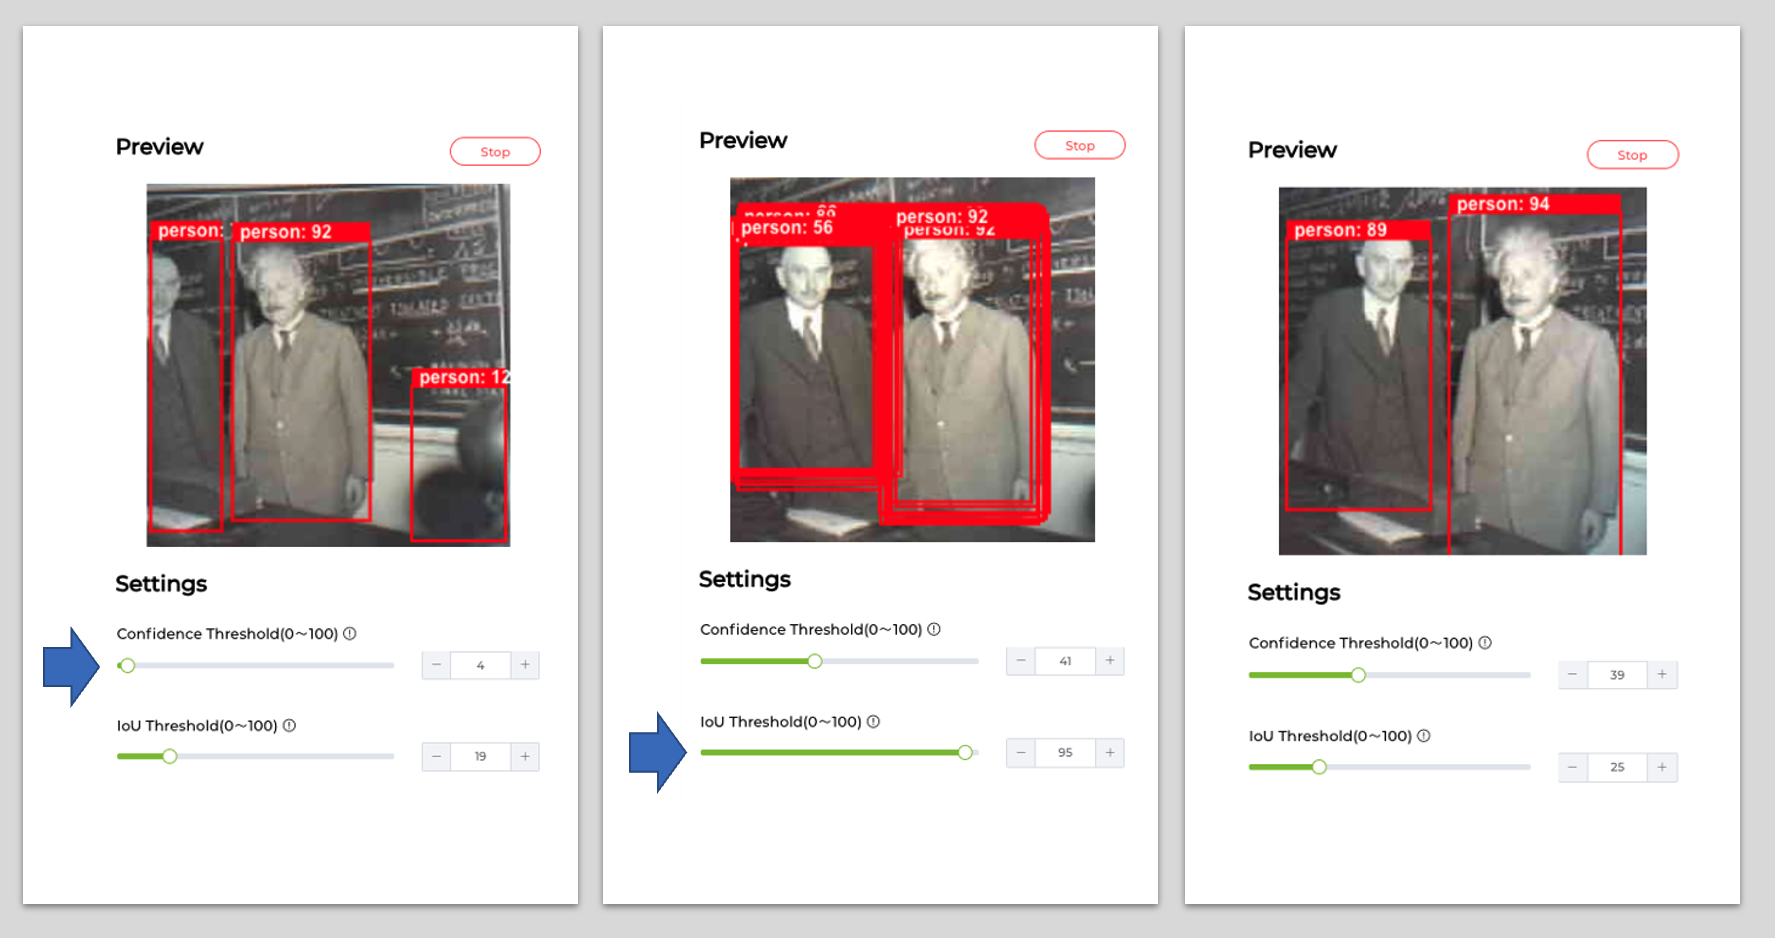
Experiment with different values for the Confidence Threshold and IoU Threshold to find the optimal balance between detecting persons accurately and minimizing false positives. The best settings may vary depending on our specific application and the characteristics of the images or video feed.
Pose/Keypoint Detection
Pose or keypoint detection is a sophisticated area within computer vision that focuses on identifying specific points of interest within an image or video frame, often related to human bodies, faces, or other objects of interest. This technology can detect and map out the various keypoints of a subject, such as the joints on a human body or the features of a face, enabling the analysis of postures, movements, and gestures. This has profound implications for various applications, including augmented reality, human-computer interaction, sports analytics, and healthcare monitoring, where understanding human motion and activity is crucial.
Unlike general object detection, which identifies and locates objects, pose detection drills down to a finer level of detail, capturing the nuanced positions and orientations of specific parts. Leading architectures in this field include OpenPose, AlphaPose, and PoseNet, each designed to tackle the challenges of pose estimation with varying degrees of complexity and precision. Through advancements in deep learning and neural networks, pose detection has become increasingly accurate and efficient, offering real-time insights into the intricate dynamics of subjects captured in visual data.
So, let’s explore this popular CV application, Pose/Keypoint Detection.
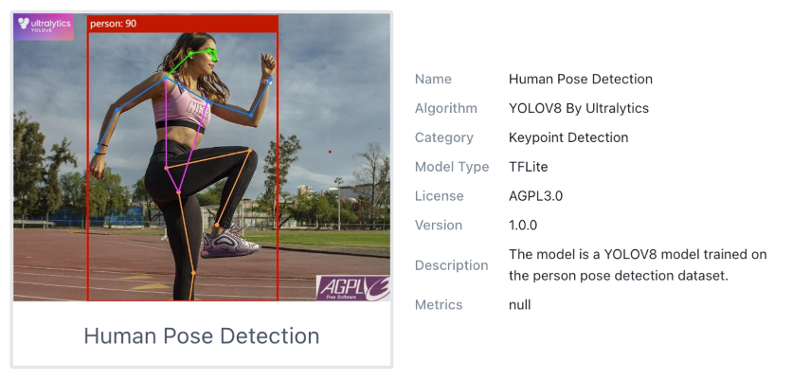
Stop the current model inference by pressing [Stop] in the Preview area. Select the model and press [Send]. Once the model is uploaded successfully, you can view the live feed from the Grove Vision AI (V2) camera in the Preview area on the right, along with the inference details displayed in the Serial Monitor (accessible by clicking the [Device Log] button at the top).
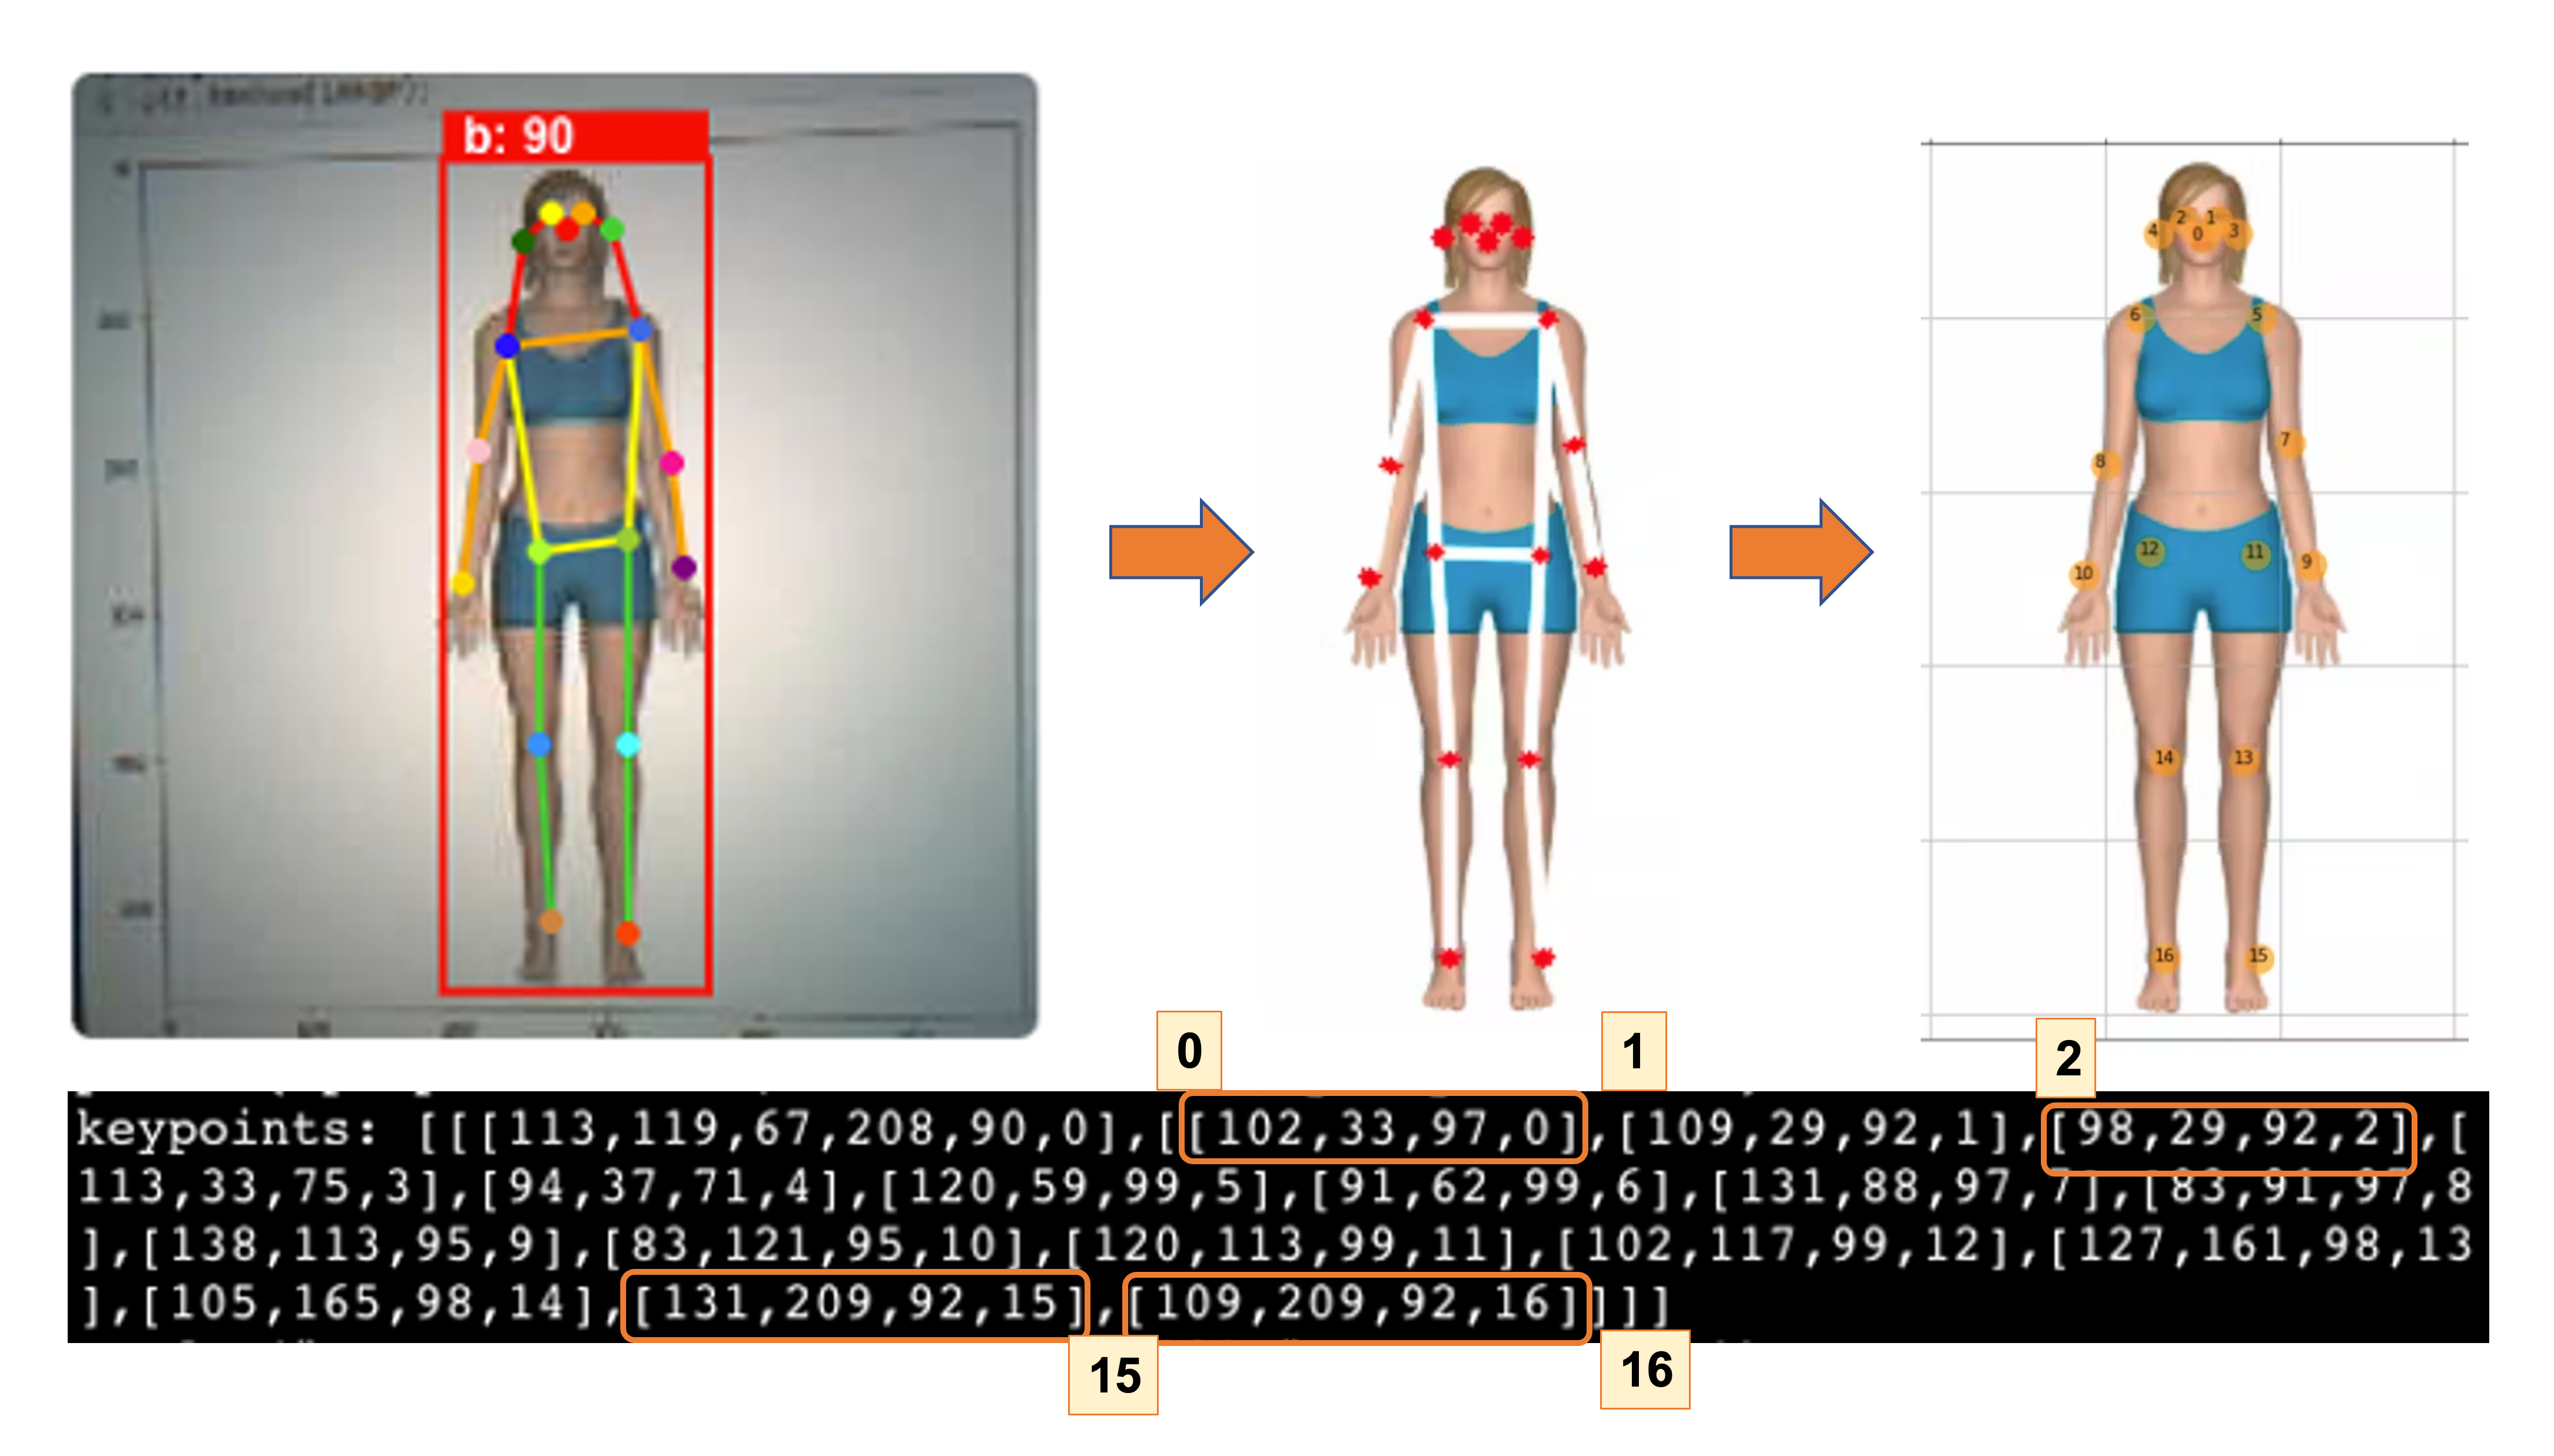
The YOLOV8 Pose model was trained using the COCO-Pose Dataset, which contains 200K images labeled with 17 keypoints for pose estimation tasks.
Let’s look at a single screenshot of the inference (to simplify, let’s analyse an image with a single person in it). We can note that we have two lines, one with the inference performance in milliseconds (121 ms) and a second line with the keypoints as below:
- 1 box of info, the same as we got with the object detection example (box coordinates (113, 119, 67, 208), inference result (90), label (0).
- 17 groups of 4 numbers represent the 17 “joints” of the body, where ‘0’ is the nose, ‘1’ and ‘2’ are the eyes, ‘15’ and’ 16’ are the feet, and so on.
To understand a pose estimation project more deeply, please refer to the tutorial: Exploring AI at the Edge! - Pose Estimation.
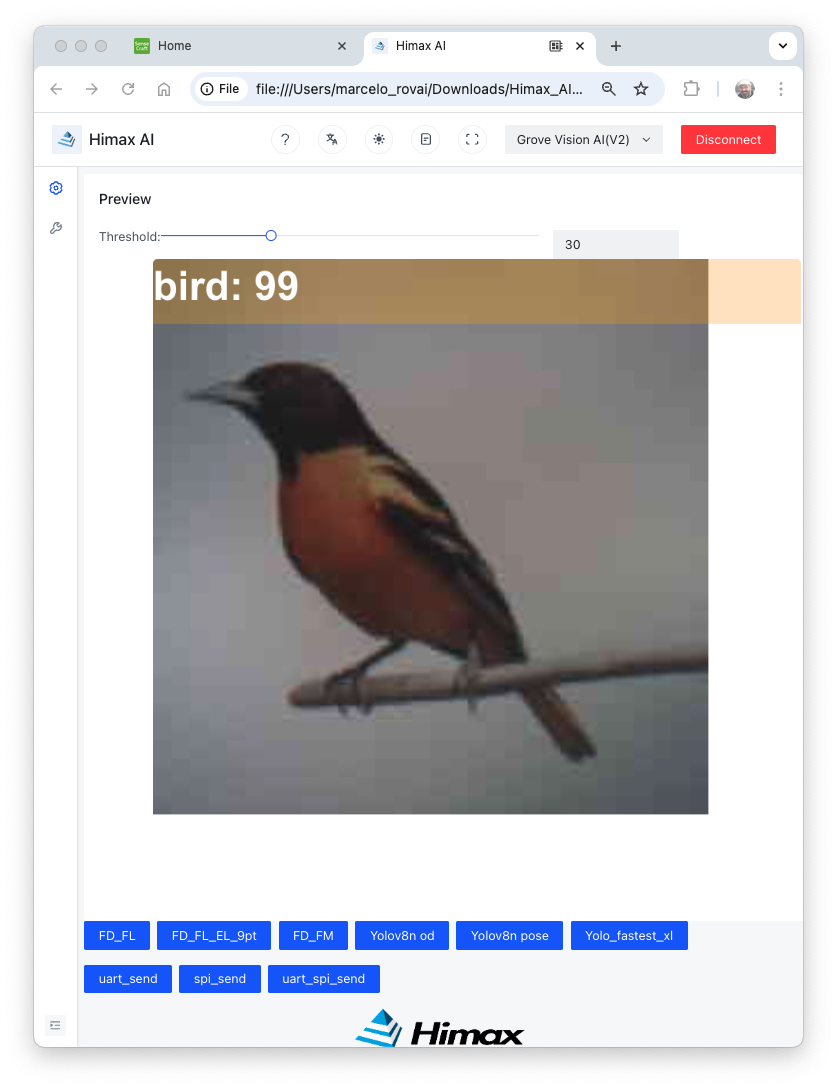
Image Classification
Image classification is a foundational task within computer vision aimed at categorizing entire images into one of several predefined classes. This process involves analyzing the visual content of an image and assigning it a label from a fixed set of categories based on the predominant object or scene it contains.
Image classification is crucial in various applications, ranging from organizing and searching through large databases of images in digital libraries and social media platforms to enabling autonomous systems to comprehend their surroundings. Common architectures that have significantly advanced the field of image classification include Convolutional Neural Networks (CNNs), such as AlexNet, VGGNet, and ResNet. These models have demonstrated remarkable accuracy on challenging datasets, such as ImageNet, by learning hierarchical representations of visual data.
As the cornerstone of many computer vision systems, image classification drives innovation, laying the groundwork for more complex tasks like object detection and image segmentation, and facilitating a deeper understanding of visual data across various industries. So, let’s also explore this computer vision application.
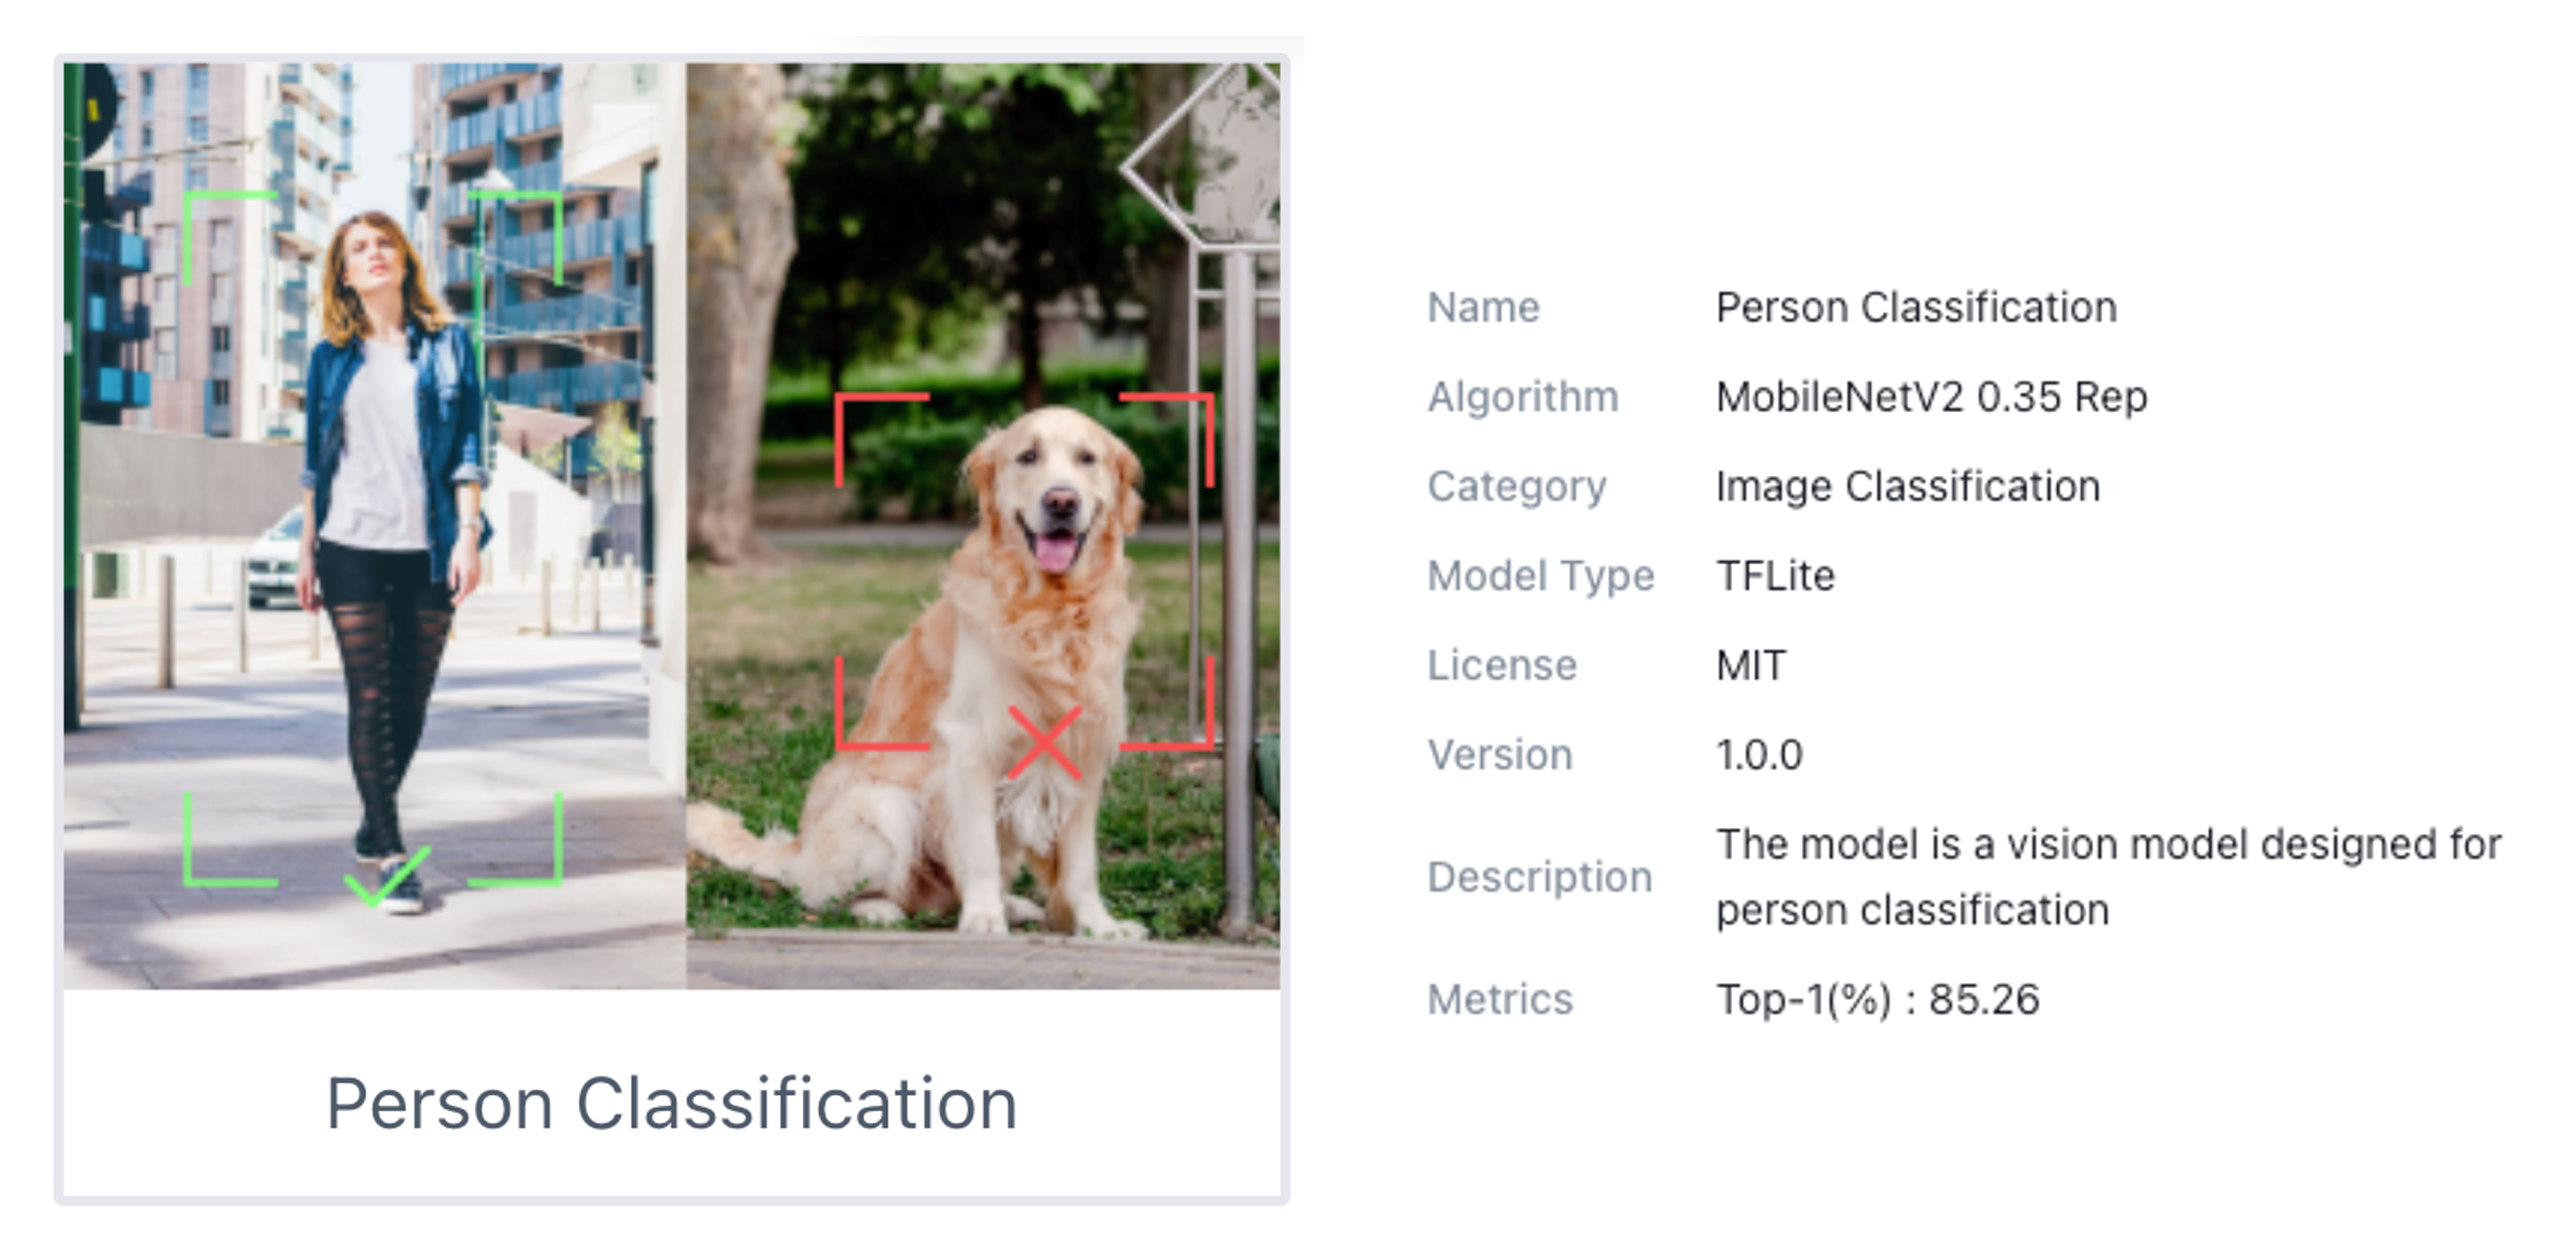
This example is available on the SenseCraft ToolKit, but not in the SenseCraft AI Studio. In the last one, it is possible to find other examples of Image Classification.
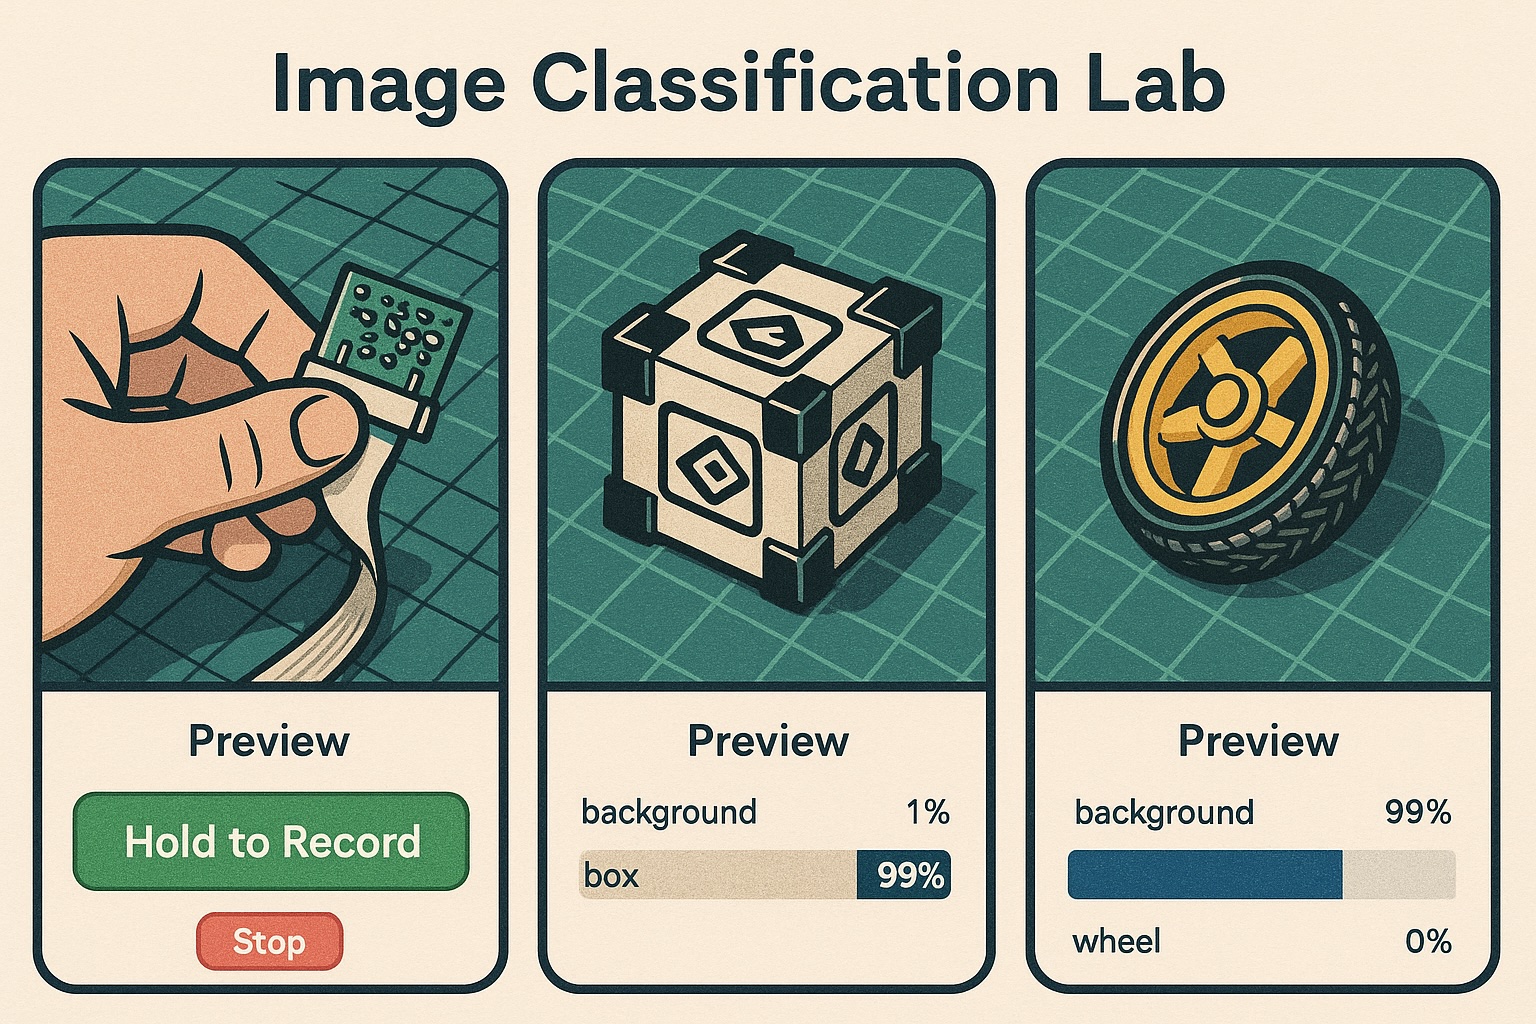
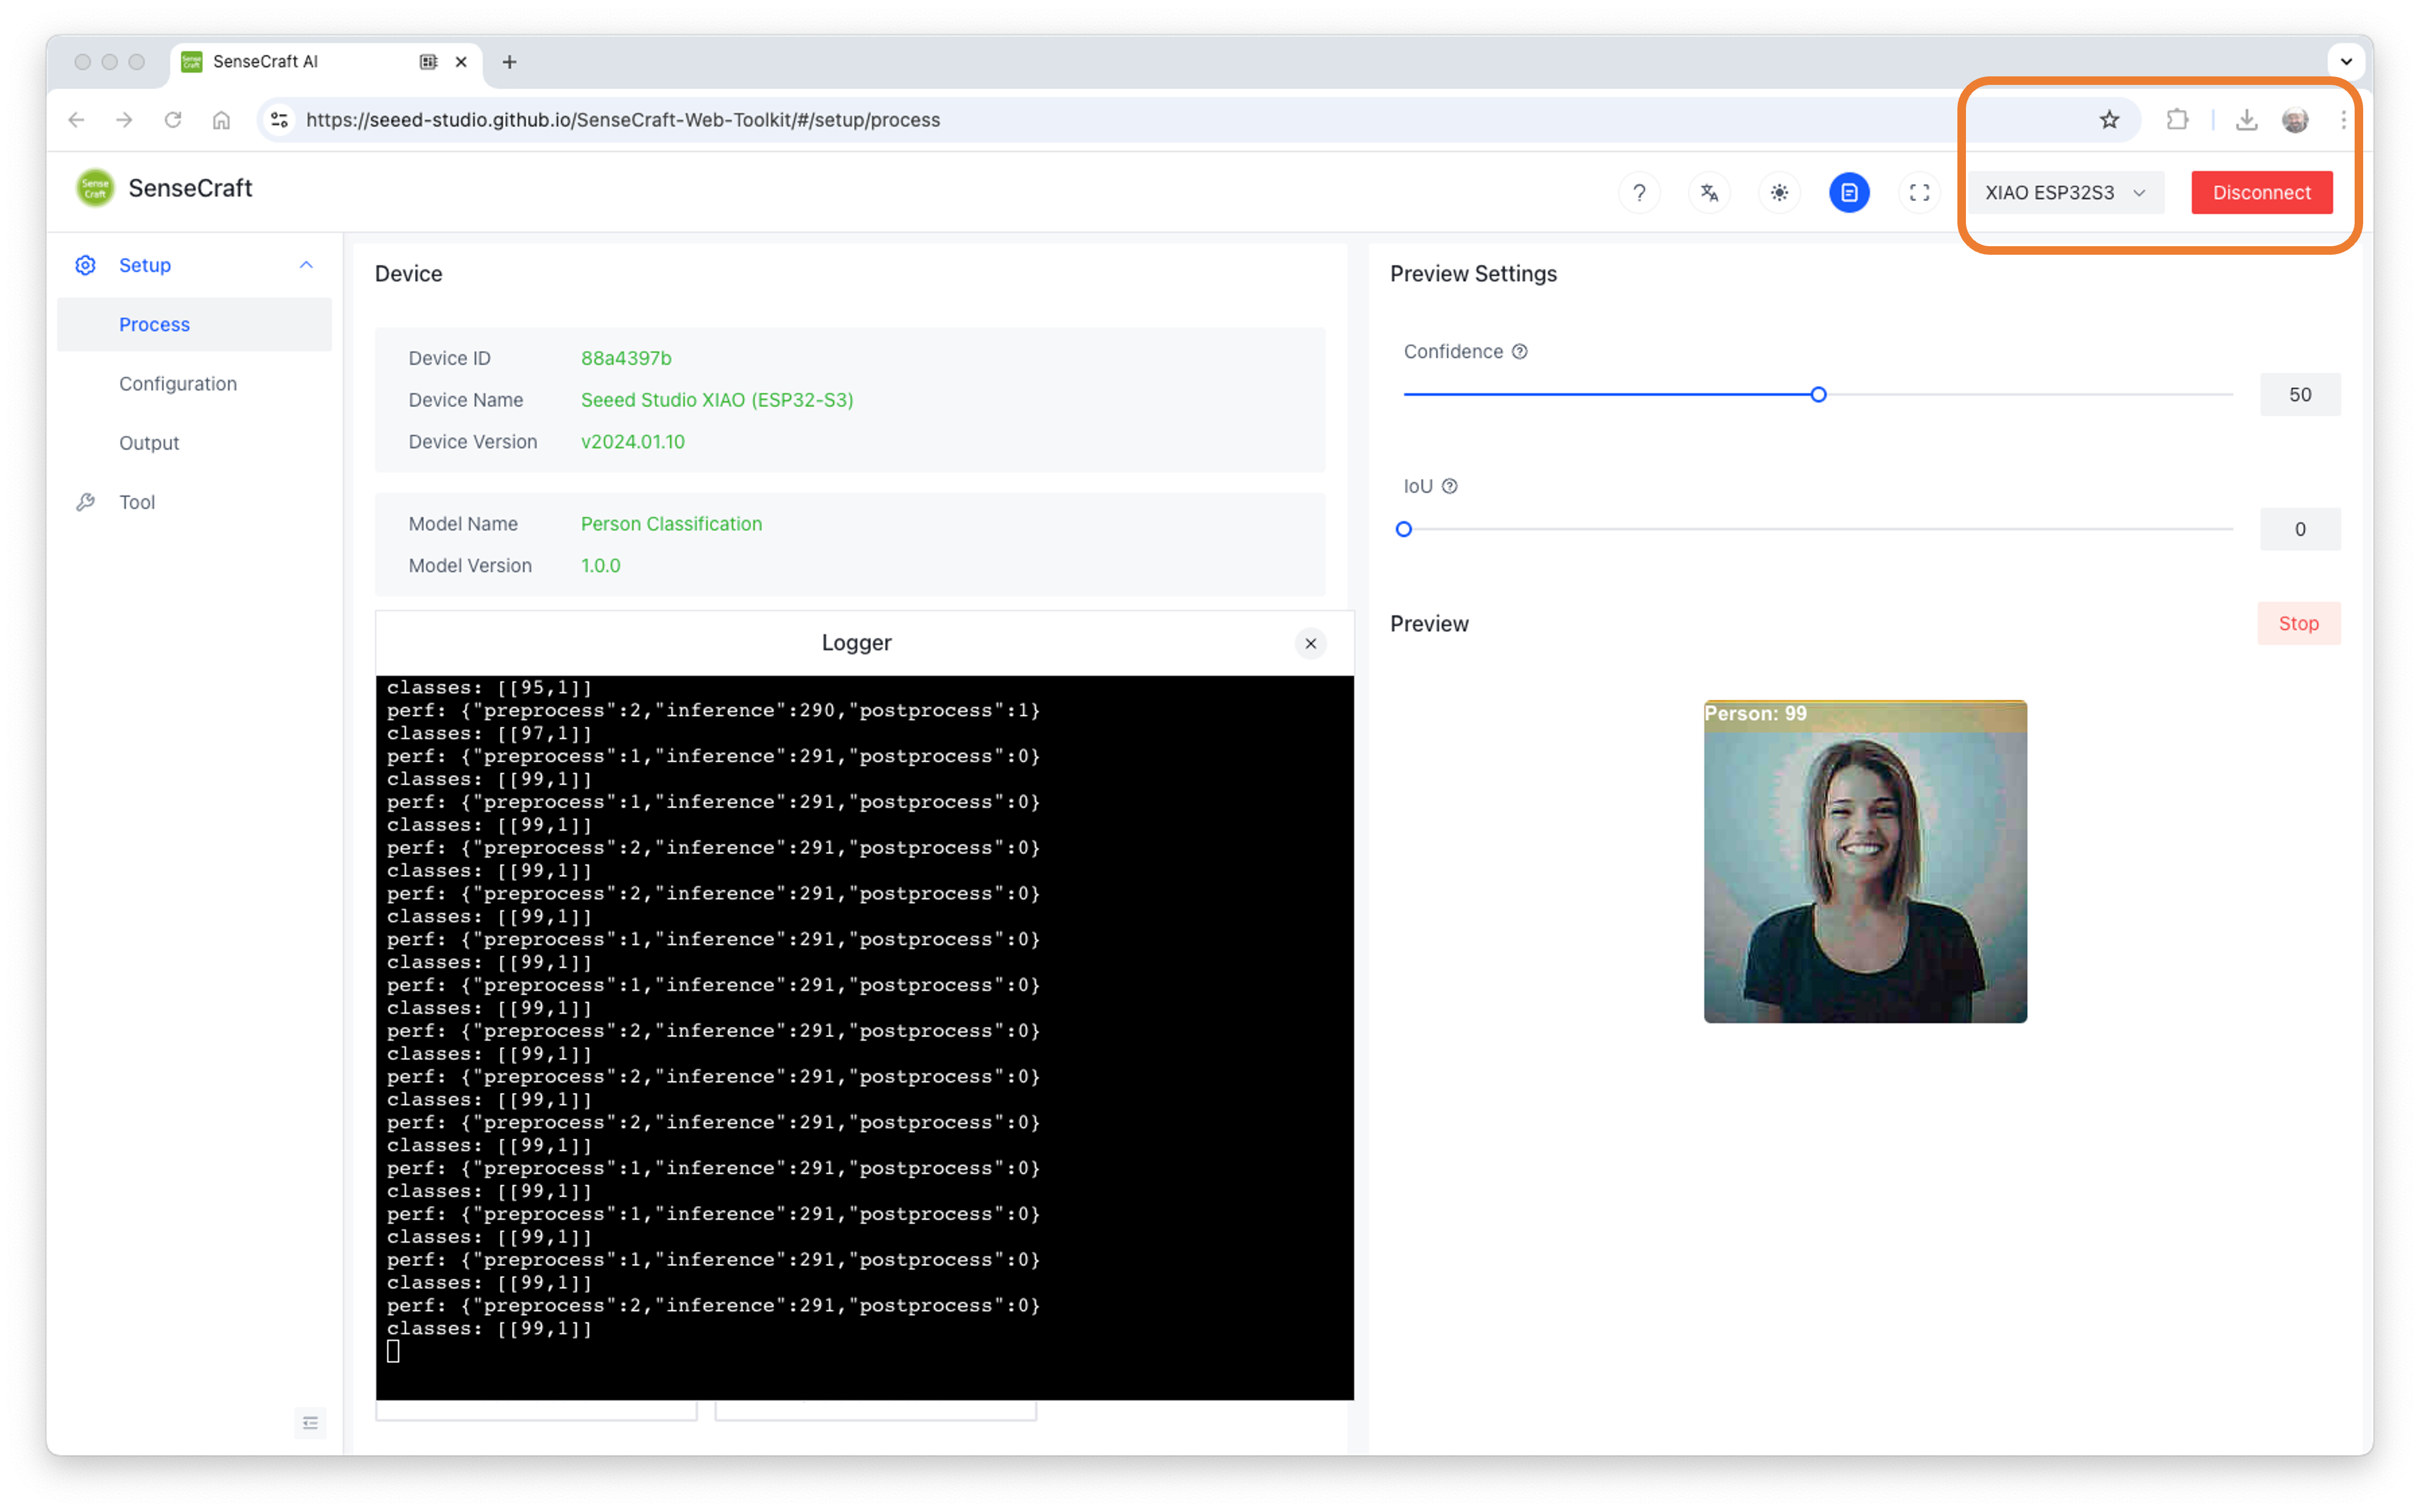
After the model is uploaded successfully, we can view the live feed from the Grove Vision AI (V2) camera in the Preview area on the right, along with the inference details displayed in the Serial Monitor (by clicking the [Device Log] button at the top).
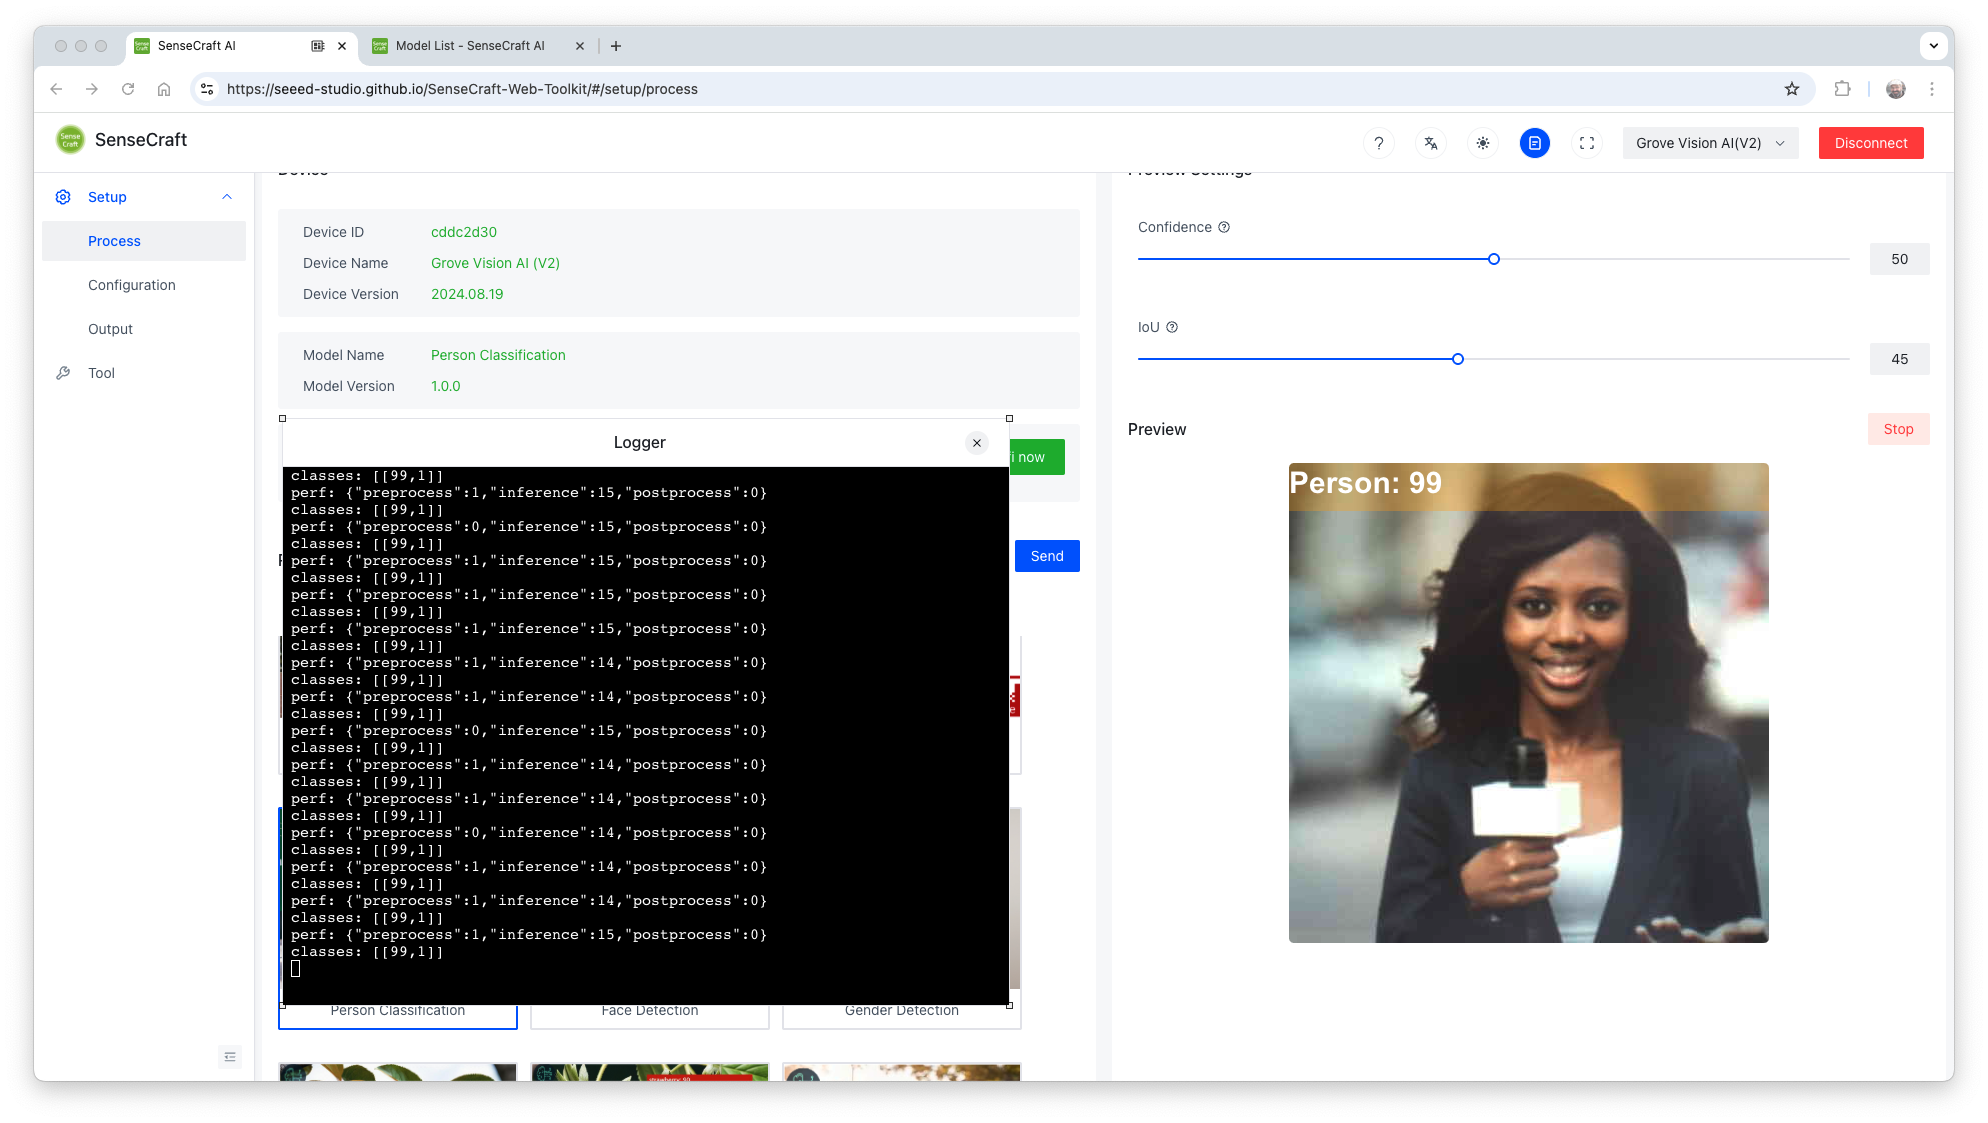
As a result, we will receive a score and the class as output.

For example, [99, 1] means class: 1 (Person) with a score of 0.99. Once this model is a binary classification, class 0 will be “No Person” (or Background). The Inference latency is 15ms or around 70fps.
Power Consumption
To run the Mobilenet V2 0.35, the Grove Vision AI V2 had a peak current of 80mA at 5.24V, resulting in a power consumption of 420mW.
Running the same model on XIAO ESP32S3 Sense, the power consumption was 523mW with a latency of 291ms.
Exploring Other Models on SenseCraft AI Studio
Several public AI models can also be downloaded from the SenseCraft AI WebPage. For example, you can run a Swift-YOLO model, detecting traffic lights as shown here:
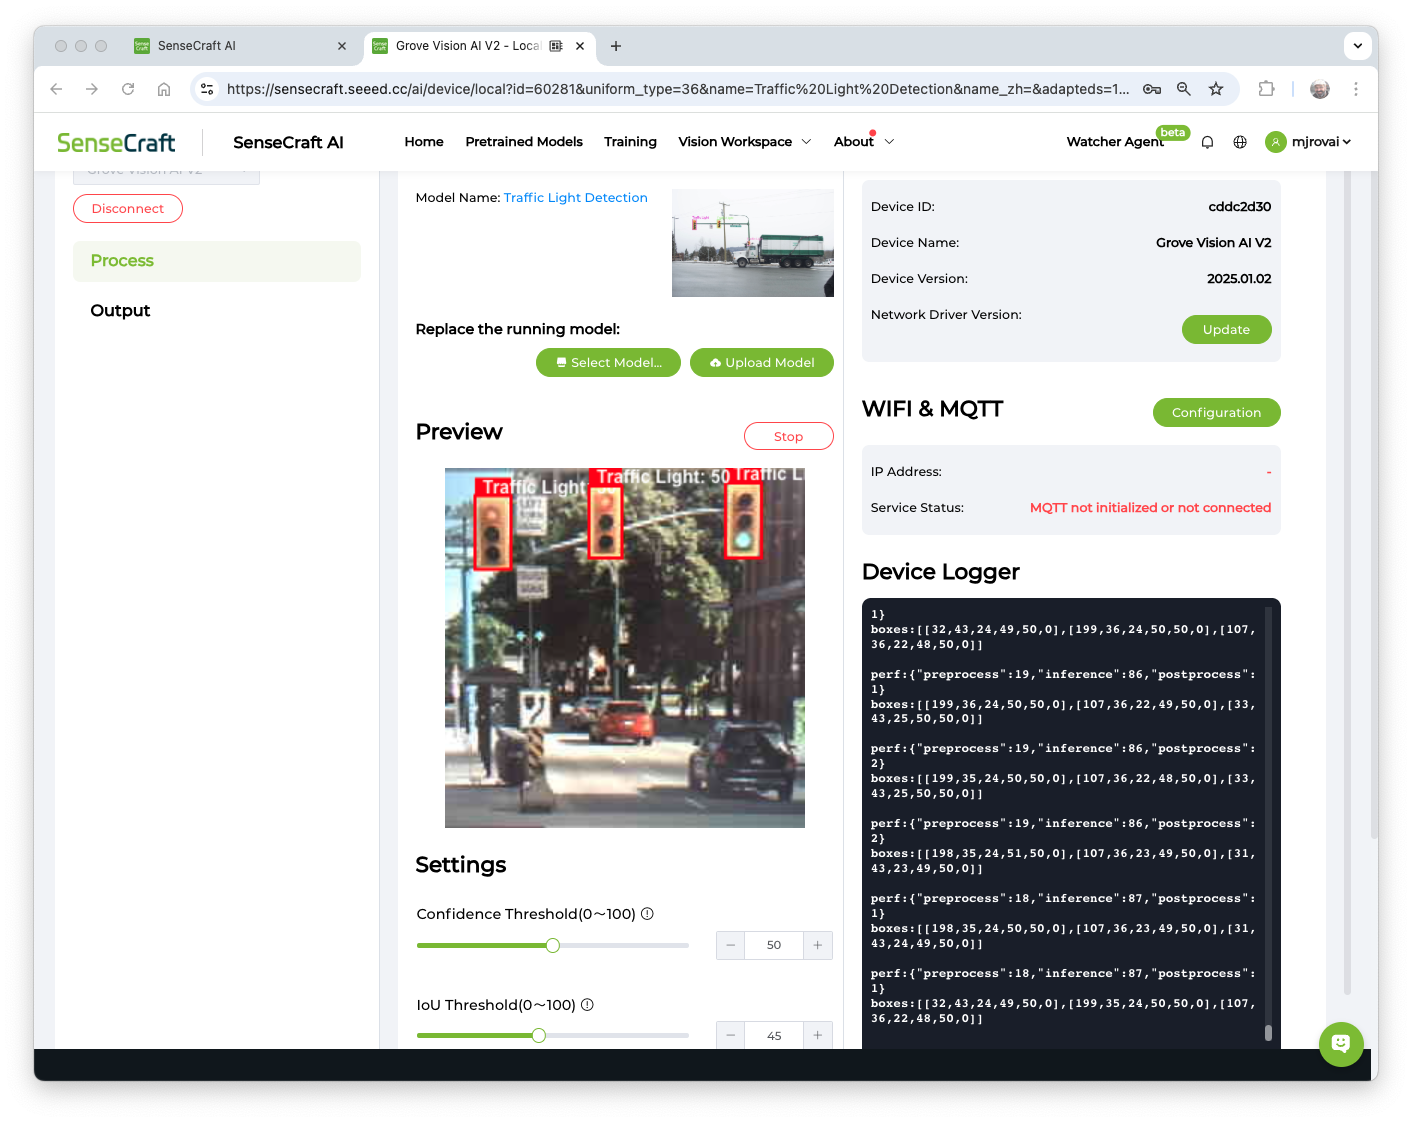
The latency of this model is approximately 86 ms, with an average power consumption of 420 mW.
An Image Classification Project
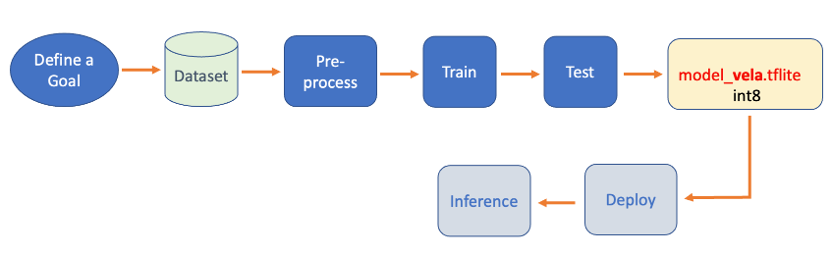
Let’s create a complete Image Classification project, using the SenseCraft AI Studio.
On SenseCraft AI Studio: Let’s open the tab Training:
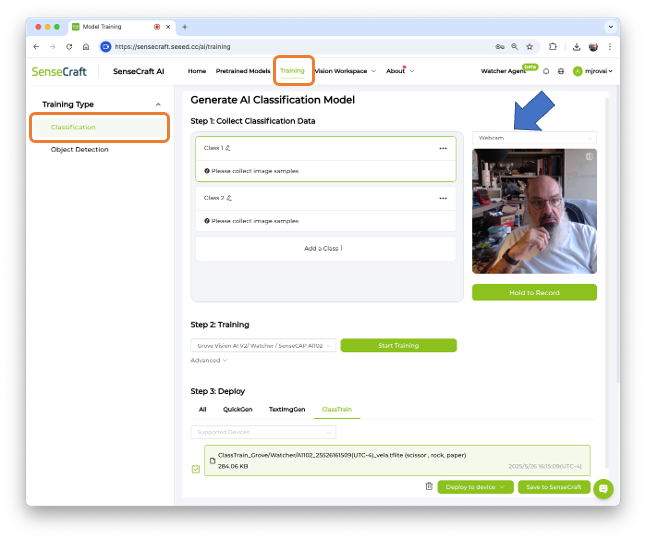
The default is to train a Classification model with a WebCam if it is available. Let’s select the Grove Vision AI V2 instead. Pressing the green button[Connect], a Pop-Up window will appear. Select the corresponding Port and press the blue button [Connect].

The image streamed from the Grove Vision AI V2 will be displayed.
The Goal
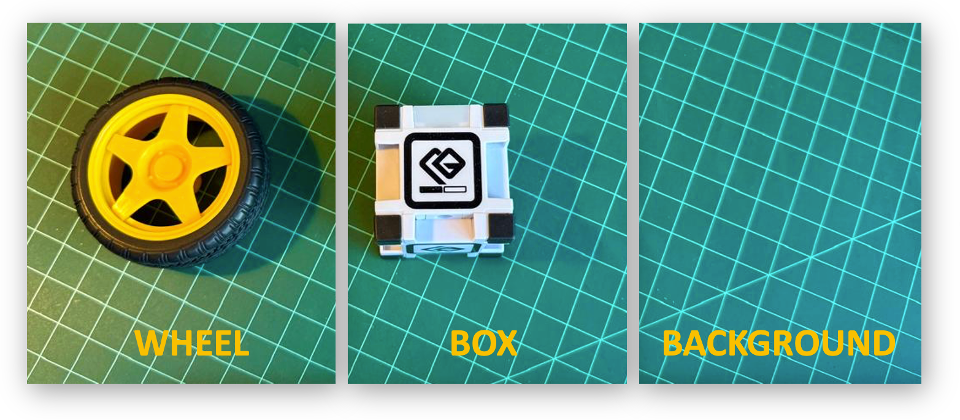
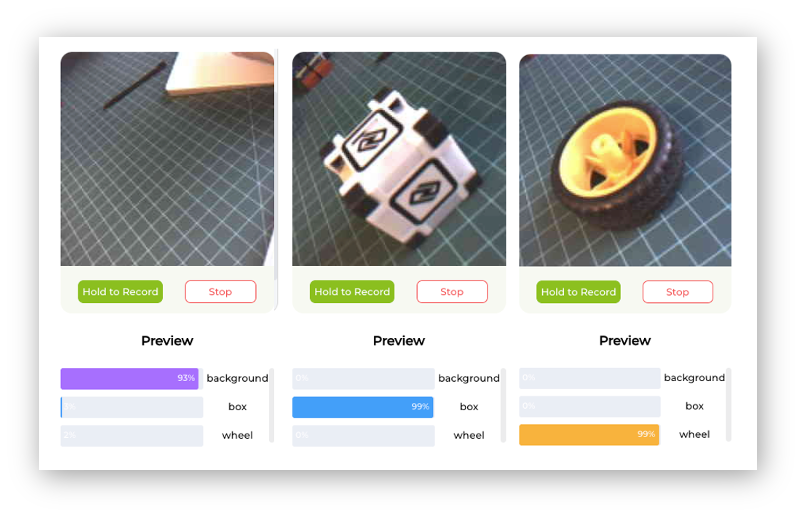
The first step is always to define a goal. Let’s classify, for example, two simple objects—for instance, a toy box and a toy wheel. We should also include a 3rd class of images, background, where no object is in the scene.
Data Collection
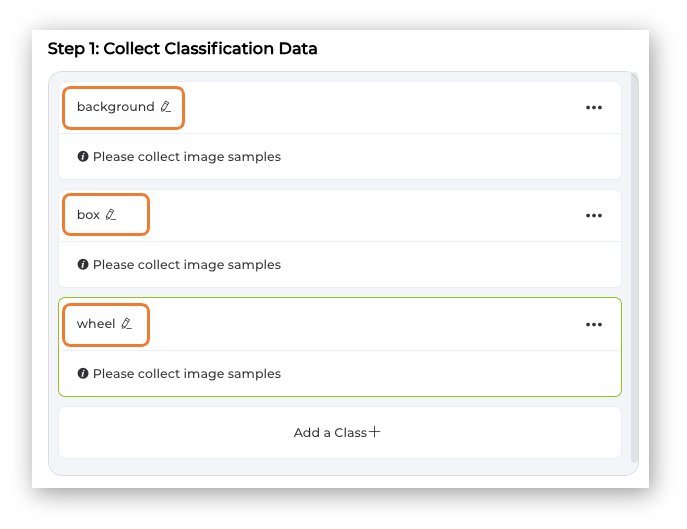
Let’s create the classes, following, for example, an alphabetical order:
- Class1: background
- Class 2: box
- Class 3: wheel
Select one of the classes and keep pressing the green button under the preview area. The collected images will appear on the Image Samples Screen.
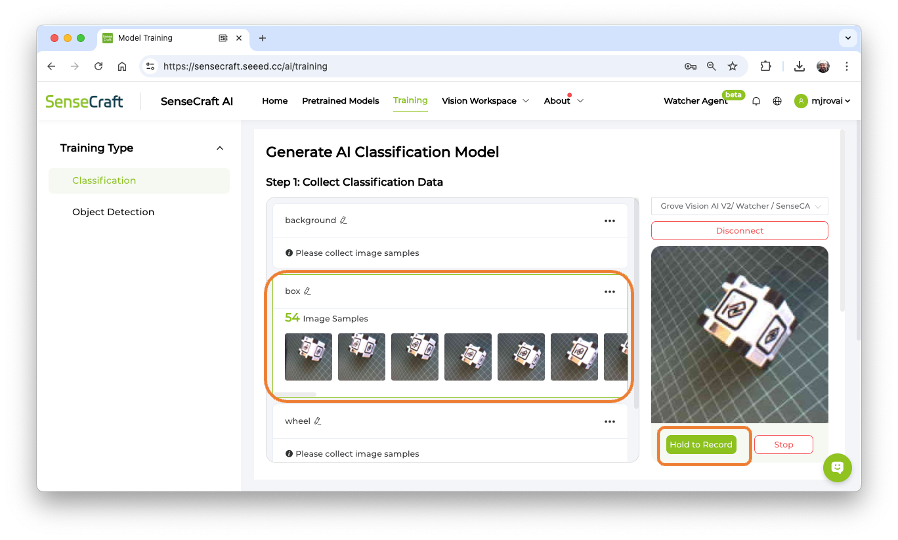
After collecting the images, review them and delete any incorrect ones.

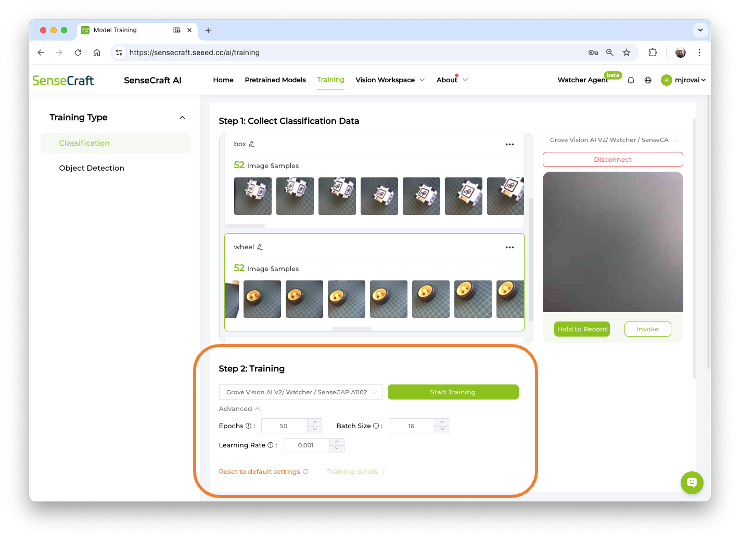
Collect around 50 images from each class and go to Training Step:
Training
Confirm if the correct device is selected (Grove Vision AI V2) and press [Start Training]
Test
After training, the inference result can be previewed.
Note that the model is not running on the device. We are, in fact, only capturing the images with the device and performing a live preview using the training model, which is running in the Studio.
Now is time to really deploy the model in the device:
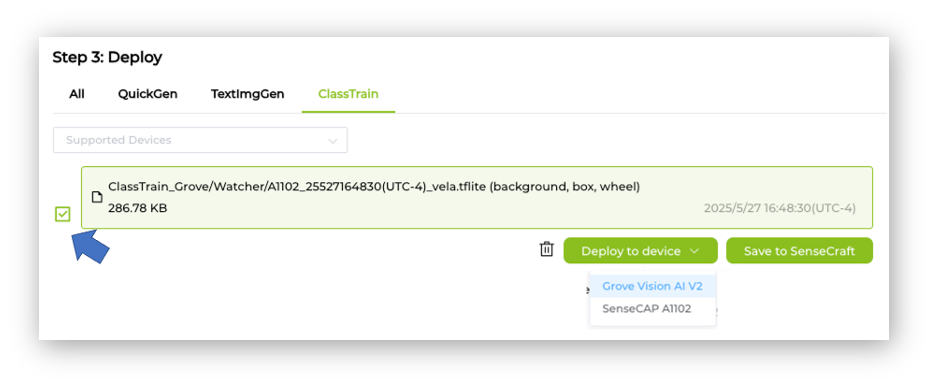
Deployment
Select the trained model on [Deploy to device], select the Grove Vision AI V2:
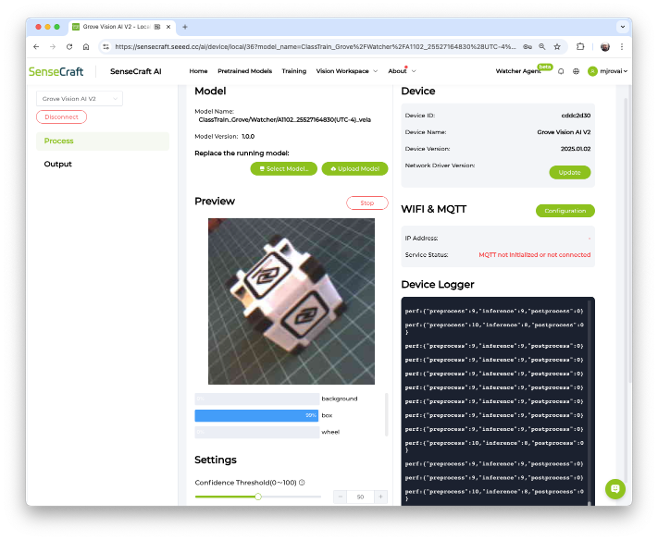
The Studio will redirect us to the Vision Workplace tab. Confirm the deployment, select the appropriate Port, and connect it:

The model will be flashed into the device. After an automatic reset, the model will start running on the device. On the Device Logger, we can see that the inference has a latency of approximately 8 ms, corresponding to a frame rate of 125 frames per second (FPS).
Also, note that it is possible to adjust the model’s confidence.
To run the Image Classification Model, the Grove Vision AI V2 had a peak current of 80mA at 5.24V, resulting in a power consumption of 420mW.
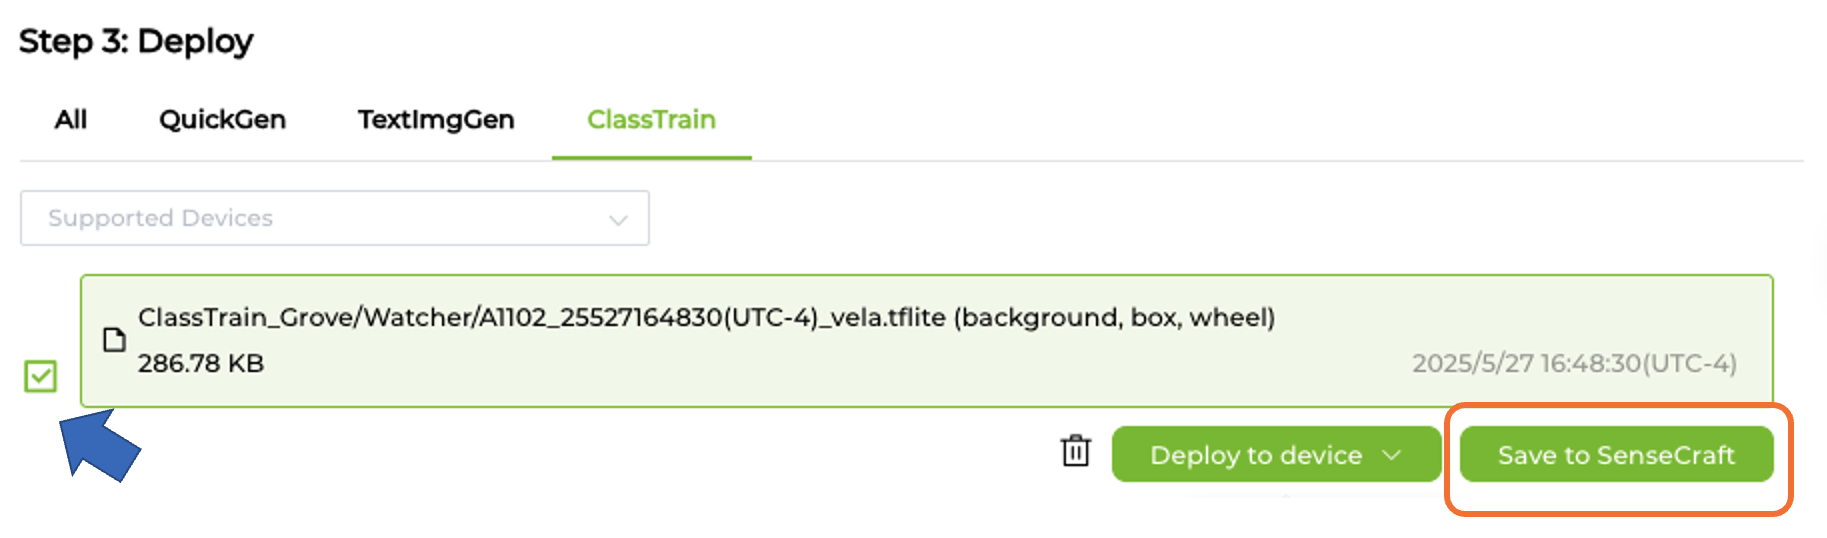
Saving the Model
It is possible to save the model in the SenseCraft AI Studio. The Studio will keep all our models, which can be deployed later. For that, return to the Training tab and select the button [Save to SenseCraft]:
Summary
In this lab, we explored several computer vision (CV) applications using the Seeed Studio Grove Vision AI Module V2, demonstrating its exceptional capabilities as a powerful yet compact device specifically designed for embedded machine learning applications.
Performance Excellence: The Grove Vision AI V2 demonstrated remarkable performance across multiple computer vision tasks. With its Himax WiseEye2 chip featuring a dual-core Arm Cortex-M55 and integrated ARM Ethos-U55 neural network unit, the device delivered:
- Image Classification: 15 ms inference time (67 FPS)
- Object Detection (Person): 48 ms to 76 ms inference time (21 FPS to 13 FPS)
- Pose Detection: 121 ms real-time keypoint detection with 17-joint tracking (8 FPS)
Power Efficiency Leadership: One of the most compelling advantages of the Grove Vision AI V2 is its superior power efficiency. Comparative testing revealed significant improvements over traditional embedded platforms:
- Grove Vision AI V2: 80 mA (410 mW) peak consumption (60+ FPS)
- XIAO ESP32S3: Performing similar CV tasks (Image Classification) 523 mW (3+ FPS)
Practical Implementation: The device’s versatility was demonstrated through a comprehensive end-to-end project, encompassing dataset creation, model training, deployment, and offline inference.
Developer-Friendly Ecosystem: The SenseCraft AI Studio, with its no-code deployment and integration capabilities for custom applications, makes the Grove Vision AI V2 accessible to both beginners and advanced developers. The extensive library of pre-trained models and support for custom model deployment provide flexibility for diverse applications.
The Grove Vision AI V2 represents a significant advancement in edge AI hardware, offering professional-grade computer vision capabilities in a compact, energy-efficient package that democratizes AI deployment for embedded applications across industrial, IoT, and educational domains.
Key Takeaways
This Lab demonstrates that sophisticated computer vision applications are not limited to cloud-based solutions or power-hungry hardware, as the Raspberry Pi or Jetson Nanos – they can now be deployed effectively at the edge with remarkable efficiency and performance.
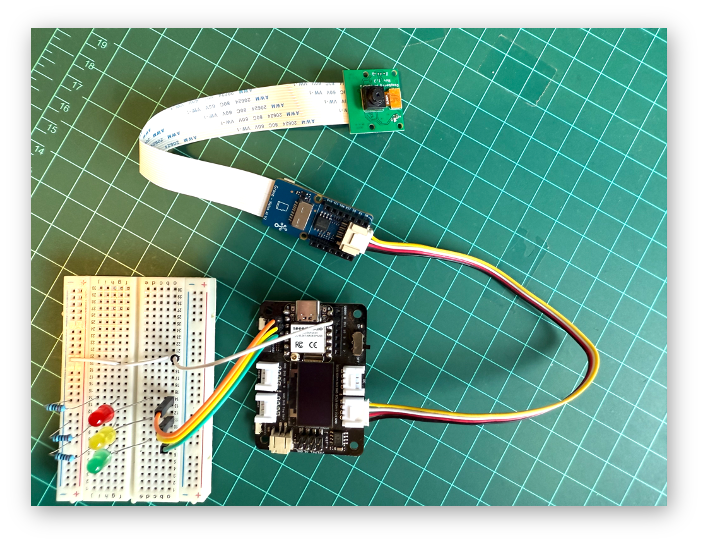
Optionally, we can have the XIAO Vision AI Camera. This innovative vision solution seamlessly combines the Grove Vision AI V2 module, XIAO ESP32-C3 controller, and an OV5647 camera, all housed in a custom 3D-printed enclosure:

Resources
SenseCraft AI Studio Instructions.